Showing posts sorted by relevance for query weave in ends. Sort by date Show all posts

Thursday, April 03, 2014

I'M HAPPY AND ANGRY.

Probably the real news here is that I've knitted again, which is meant to sound as sinister as "I've killed again" because I nearly did.

People - knitting is not relaxing.

I just don't care who says it and with what frequency. For me, knitting is a dangerous game of I'M GOING TO FUCKING KILL EVERYONE IF THIS DOESN'T WORK ON THIS VERY NEXT TRY and, so often, this is what it comes down to.

My latest knitting project is absolutely no different.

See, I came across this hysterical pattern on Ravelry. Or maybe someone forwarded it to me? I honestly can't recall. The rage has erased a good part of my short term memory.

So, obviously once I saw this pattern, my fingers started twitching and swears started revving up because OH I MUST MAKE THIS.
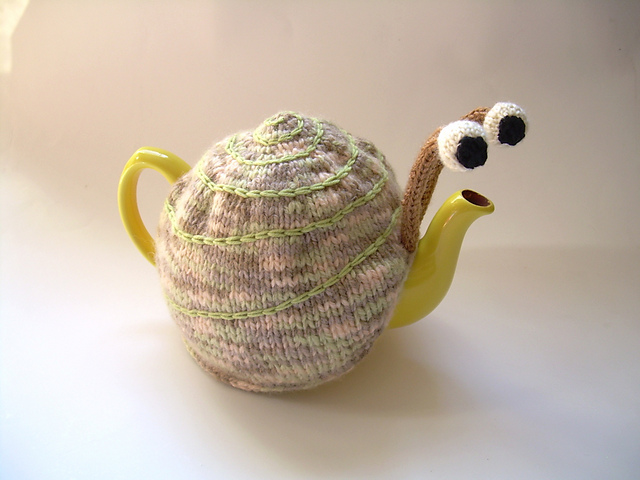
oooooooooooooooooooooooooooooooooooOOOOOOooooooooooooo

Because of its hilariousness. And eyeballness. And hilarious eyeballness.

But, of course, I can't just make things all willy nilly without a purpose, so I decided I'd make it for my dad. Because it's his birthday tomorrow. And he drinks tea.

And likes snails? Wait, no.

He likes his teapot to stare at him? Nope.

His teapot is cold? Not that I know of.

Whatever.

I thought I'd knit this crazy ass thing and offset its absolute weirdness with things I know that he does like so that he wouldn't hate me or think I was, like, late stage retarded or something.

So I knit the thing up and put it with a box of Girl Scout Thin Mints, some really good black tea and a tea ball shaped like an elephant.

Not that the elephant part is relevant, but that was what I found and it amused me and let's be honest here - it's clearly all about my amusement.

And by it I mean everything.

Obviously.

But about my rage knitting.

It was ragefull.

And let me now summarize for you a few things about knitting that inspire the greatest amount of rage.

Firstly, there was a lot of "Make two" going on in this muther fucker of a pattern. Like, "Make two eyeballs" and "Make two pupils" and "Make two shafts" (HA! SHAFTS! I'm real mature.) and such. And you know how much I hate any pattern that requires me to knit something and then, just when I'm finished with it and I see the light at the end of the tunnel and oh I have a finished object NOPE..."Make two".

I mean, I get it. If you're going to have a pair of anything: gloves, socks, eyeballs, whatever - you're going to need two of them and I know that the pattern is going to say to "Make two" and I know that when I get to that part in the pattern that I will roll out my special "Make two" swears and call it a scheming sunuvabitching whore.

But I'll get over it.

And make two like a fucking grown-up.

But here's a knitting thing that I've only touched on ever so briefly in the past but enrages me like fucking fire: Weave in ends.

OH REALLY? IS THAT ALL? Just weave in the ends like in five seconds and then we're on our way TO where everything looks perfect and will stay put just like so?

You know what I always say when I get to the part of every pattern where it says, "Just weave in ends."?

JUST FUCKING BLOW IT OUT YOUR ASS.

That's what I say. Because I am the boss of knitting. I point at the thing I've just slaved away knitting and go, "Oh yeah, sweater that I've been knitting for half of my adult life? Just weave in the five thousand ends you have dangling all over the place? WHY DON'T YOU JUST BLOW IT OUT YOUR ASS/SLEEVE HOLE?"

My rage comes from the fact that "just" weaving in the ends is always this mystery activity of where the fuck do all these ends really go so that they don't show through the front of the work and how long do they really need to be to stay in place even if this thing gets washed and what if I just tied a good old fashioned knot here and cut the ends and called it a day and such.

Because this is my thought process every time I get to the "Just weave in ends" part of every pattern after I have my temper tantrum wherein I command the pattern to blow it out of its non-existent ass.

Again - I'm real mature.

But also, saying "Attach securely to [project]" isn't helpful at all.

HOW?

HOW WOULD YOU SUGGEST I ACHIEVE THIS ALLEGED SECURE ATTACHMENT?

HOW DID YOU DO IT?

ARE YOU MAGIC?

CAN I BORROW YOUR MAGIC WAND TO SECURELY ATTACH THESE SHAFTS (HA! SORRY.) TO THIS SNAIL TEAPOT COZY?

NO?

Well, then you can blow it out your ass, too. You and your pattern can have an ass blowing party and I'll just sit here and burn over the ridiculousness of this pattern and...oh wait...I got it...oh my god that's the most hilarious thing I've ever madetotallyworthitHOORAY.


So, yeah. 

The Snail Tea Cozy is, to me, entertaining and hysterical and also a little cute and that's sort of helping me forget about the fact that it took me more than 10 tries to get this thing started properly because the pattern calls for starting with 6 stitches knitting in the round on double pointed needles.

Because the chick that designed this pattern hates people, so she makes adorable patterns using punishing techniques and thank the maker that someone had the wisdom to post a crucial tip on their rendition of this pattern, "I started by making a 12-chain crochet ring, then picked up stitches out of it and knit from round 3 of the pattern."

That helped a lot, Annettle. You're tits.

Without that nugget of wisdom, for which I was wholeheartedly searching after failing over a dozen times at the start of this pattern, I would have burned my entire knitting stash after stabbing my eyes out with all of my needles.

Twice.

Friday, October 19, 2007

The best timing...so far

Baby Bolero
Yarn: Blue Sky Organic Cotton Yarn, Sage
Needles: US 8 circular, Tapestry needle
Pattern in OneSkein, Leigh Radford

I started a Baby Bolero sweater from the OneSkein book a few weeks ago when I realized that everyone I knew was pregnant.

I figured I'd get started on a project that I could hopefully replicate in different colors fast enough to keep time with all the babies showing up.

So far I'm on track to keep up with at least the babies currently brewing. Although it appears there will be more babies and I'll fall behind my baby sweater making schedule since every single day someone new tells me they are pregnant or "trying" or implies some other forthcoming baby situation that requires hand knit recognition.

Sure, I could go to their registries for gifts, but I don't know what any of that crap is and feel weird ordering boob cup attachments for breast pumps that are going to be touching my friend's naked tatas.

I'd rather knit.

Maybe they'll hate me because I'm doing that ignoring of the ever-precious registry thing that everyone gets all pissed off about (not that I bitched about this a lot when I got married and people gave us ugly vases instead of the white plates I'd registered for or anything - I'm just saying) but the only things that ring any bells on there are car seats and Butt Paste (obviously awesome) and most of the time these things are either wicked pricey or already taken, respectively.

Sidenote: I did come across a friend's registry recently that had both of these items miraculously unpurchased so, probably due to the initial shock, got both and tried not to look directly at the nippley gadgets in the category above the Butt Paste. Really, people, what happens to your boobs and asses? Nevermind. Let's not discuss this.

Anyway, screw your weird registries of plastic shapes I don't recognize - I'm making baby sweaters. That's not bad, right? I mean, I assume babies do not like being cold any more than I do (one could argue that my Ugly Librarian Sweater is just a huge fugly adult version of these sweaters with a zipper) and a sweater would be a practical gift for the hundreds of people having babies in the winter months.

And, apparently my No Rest for the Childfree knitting schedule is working because I got an invite to a good friend's out of state shower happening this weekend and had, TAH-DOW, a freshly hand-knit and adequately blocked Baby Bolero ready to wrap and send.

Oh yes. It was a grand moment in my life of searching for efficiency and uniqueness. Usually I settle for being one or the other: showing up well-rested with a store-bought gift OR showing up with yarn in my hair and bags under my eyes from staying up most of the night to finish the very cute and personal hooded baby blanket (or whatever) craftily wrapped in tissue and ribbon with cute Care Instructions on recycled paper pinned to the corner.

It is a rare and glorious day when I get to give a handmade gift that doesn't try to kill me in the process. And aside from the puny eyelet pattern that I had to rip out 10 times (really, at least 10) because I refused to stop drinking my wine long enough to decode the not-hard seven line pattern, this was a pretty fast and easy little sweater.


We will not be talking about the one hundred ends I had to weave in after assembling all the parts because I think we all know that sucks so I don't need to rehash it even though I have plenty of swears I could use to describe the process of thinking one is done "weaving in ends" when one is, in fact, only halfway there. And I love that it just says something like, "BO. Weave in ends." like it takes five seconds when in fact it takes like two hours, but you know.

For those of you about to take yarn to needle for this pattern, I will share a few of my personal shortcutting notes:
  • Changing from size 8 - 9 needles at random intervals per the pattern instructions seemed like a tedious waste of time and I did not do it. My sweater does not look any different from those who have done it this way and I now feel vindicated in my rebellion. I encourage the same descention.
  • Despite what others have told me, this pattern did not leave enough yarn left over from the One Skein to make a baby hat. I've decided these people are all liars and that my decision not to change needles had no impact on the amount of leftover yarn and I do not care to hear otherwise.
  • "Provisional cast-on", as is indicated in the first line of the pattern, is, I decided, a made up method of casting on that I ignored in lieu of my normal casting on method because figuring it out was going to mean digging out my Vogue Knitting book that was all the way in the office and I didn't have that kind of time nor did I want to be separated from my beloved couch. It may very well be a real thing, but I still haven't looked it up because my normal casting on method (maybe it's a provisional cast-on? Who knows?) worked fine and I was able to retrieve the "waste yarn" they speak of without incident. So, feel free to blow it off, too, if you like to live on the edge or also don't like to leave your couch unsat upon.
That's about all the wisdom I can impart on such a small and simple pattern, but if you want to read more of my ramblings, find me on ravelry and this pattern in my Projects.

I'll probably post photos of a few more of these sweaters since I have another one in the works right now (started and finished the body last night - woo fast!) and another skein waiting in the bin.

So, ya'll, if you're pregnant right now, my friend and having a baby in any month other than July or August, expect a sweater similar to the one pictured above. And for godssake, take care of your T&A and don't tell me about it.

Monday, November 02, 2009

There's no orange in the matrix

Almost the Matrix Sweater
based on the Leaf Tshirt by Melissa LaBarre
Yarn: Rowan RYC Cashsoft DK in "Tape"
Needles: #5 24" circular needle, #5 10" circular needle, Tapestry needle
Raveled here

So, back when I asked you how y'all thought I should handle the sleeves on this thing, the majority vote was to leave them rolled.

So leave them rolled, I did.

Of course, because I'm ME and I'm apparently unable to determine how long sleeves should be even when I try on the sweater a million times before casting off (like, three times, but still, it seemed like a lot since it involved getting off the couch), I still think the sleeves are too short.

Because apparently I like my sleeves to drag the ground as I walk. Or I need them long enough to do
this trick.

Either way, them sleeves remain rolled because, as it turns out, I cast-off in an unnaturally tight manner - a contradiction to my too-loose knitting style - and so, if I want, the sleeves will remain unrolled to the edge if I just straighten out the roll. And I need them to unroll as far as possible now that they're *just* a little too short.

Oh.

The problem with the length then becomes a question of how far I want the sleeves dangling off my shoulders.

Why, hello there shoulders...

Now, while I had fully anticipated always wearing this sweater over something - in the layering manner to which I've become accustomed - I sort of imagined it would still fit like this in the shoulder.

Except, apparently, when I went to try on the sweater to check for sleeve doneness (it's highly scientific, I assure you) I didn't properly adjust the shoulders and, as such, didn't do a proper measurement of sleeve doneness and ended up with too-short sleeves. I just feel like they should be longer. For my sleeve dragging lifestyle, I suppose.

The body length, however, is perfect. And having a rolled hem at the waist is also perfect because it can be allowed to roll skyward to enhance thy waist (or whatever it does that makes it look better this way when worn over a dress) or allowed to unroll almost completely over some jeans.

The important thing to note about the rolled hems and cuffs thing is that it more effectively achieves my desire for Matrix-like attire.

For some reason, clothes with raw edges and drab colors really attract me. Like, my sense of style has a doomsday fascination or something. Meanwhile, it appears my sense of style has an unhealthy attraction to orange at the same time, resulting in some unorthodox clothing pairings.

Orange silk and "Tape" cashmere knit go together, right?

I can't account for these inconsistencies, as my sense of style is something of a mouthy bitch and I don't question her motives often.

Getting too obscure? Yeah, well, I've written over 3,000 words for NaNoWriMo so far and it's only Day Two, so my focused energies have gone into the first two chapters of a story that has yet to make sense.

Yay!

At least now I have a finished object to keep me warm while I try to develop these obstinate characters.

In the event that you, too, need to wrap yourself in a self-knit while whining your way through 50,000 words for NaNoWriMo, or just want to pretend you're in the matrix, here are my pattern notes for your perusal. Also, they're in Ravelry, but I don't want to be all exclusionary (really not sure if this how you use this word) to those in Ravelry, so I'm putting them here, too.

To promote fairness in the world. And also to self-promote. Because you know how I like to do that.

Almost the Matrix Sweater
based on the Leaf Tshirt by Melissa LaBarre
Yarn: Rowan RYC Cashsoft DK in "Tape"
Needles: #5 24" circular needle, #5 10" circular needle, Tapestry needle
Raveled here

Using the Leaf Tshirt pattern by Melissa LaBarre, I made the following adjustments to achieve a snugger fit and long sleeves:


Measure the width of your narrowest point (for me, this was my waist - 28). Take that number of inches and multiply by your stitch gauge (5 stitches = 1 inch). This is the number you cast on (142).


Knit in the round for one round and follow the pattern for the Leaf Tshirt, except DO NOT knit the Leaf pattern, and instead, just leave it out and DO NOT replace those stitches with knit stitches.


This will result in a smaller distance between arm increases on one side - this side of the sweater becomes the back of the sweater.


Following the Leaf Tshirt pattern through to the point where you have your sleeve holes of adequate size, transfer the sleeve stitches to stitch holders or scrap yarn. DO NOT CAST OFF.


Resume knitting the body section in the round, leaving the sleeve stitches on their holders, until the body is as long as you want it to be. If you’re leaving a rolled hem, knit the body long enough to accommodate some rolling. If you’re knitting a cuffed hem, knit to exact length, cast off and knit your cuff.


Once you’ve finished knitting the body, pick up the stitches of one sleeve with 10” circular needles in the same size as the body (in my case, #5), place marker at beginning of round, and knit in the round until you reach an inch above elbow length.


At one inch from the elbow:

K1,K2tog,knit to within 2 stitches of marker, SSK
Knit 1 round
K1,K2tog,knit to within 2 stitches of marker, SSK


Resume knitting in the round until you’re an inch below the elbow and follow the pattern above.


Knit until sleeves reach desired length, cast-off.


Repeat for other sleeve.


Weave in ends. Try it on. Call it a day.

Tuesday, January 13, 2009

Cashmere Cuff [PATTERN]


Cashmere Cuff by Finny
Yarn: 1/3 skein Lana Grossa Pashmina
Needles: 1 #5 10" Circular, Tapestry needle
Notions: 3 buttons

Clearly, I've been taking issue with the imperfection of scarves lately. Specifically, with their inability to properly snug my neck and fend off wind and cold.

Two things that immediately disappear the moment I go to model the inventions I've designed to ward them off.

Perhaps my inventing strength is too powerful! Perhaps just the sight of one of my neck warming type creations and the wind and cold pack up shop and run off, screaming, Oh no! That bitch has been knitting again! I won't be made a fool of! Peace out!

Or perhaps I live in Northern California where it can be 70 degrees one day right after being 30 degrees a few days before. Yes, that's probably it. Even though - boo! - I want to have super hero powers. Also, it's nice to think that the weather has the ability to reason.

Anyway, I knit a new thing to ward the evil chilliness off the necks of people who, like me, don't find satisfaction in a scarf that's needlessly long and dangly when all it really needs to be is warm and snug. And also stylish and soft with wooden buttons and a new (to me) stitch pattern. And most definitely NOT WOOL. Because, you know, me + wool = BLECH.

And so enters the Cashmere Cuff.

I have found a new use for the weeds in our yard: Photo props.

This cuff for the neck was created to serve multiple purposes, the most prominent of which being the soft cozy protecting of your neck parts, the least prominent of which being the addition of texture to one's otherwise dimensionless outfit.

Then there's the unique purpose that this one will serve as it ships off to a SF-dwelling friend as a birthday gift. Because you know it's all cold and foggy in The City and we need multipurpose items like this for city living.

And if you're this friend of mine, you also want accessorizing options. Which explains why there are three buttons instead of, say, one or zero. I thought three buttons were necessary to improve the accessorizing options. Like, for example, you could undo one or two of the buttons so that it would slouch down on one's neck for added, um, drama or somethinglikethat.

I'll let her figure out the WHY in the buttons, as she's very style-y and fashion-y and what not so will know better than I.

It became 70 degrees as soon as I walked outside.

Not necessary, you say? Pffft - just try not to unbutton one of those buttons for effect. Impossible. It's way too cute.

Anyway, you can decide which way you want to go with that. I won't pressure you anymore.

For now, here's the pattern. Also on Ravelry, in case you want to do something RAD like queue it. Just saying! Whatever.

This stitch is called the Broken 2x2 Rib, in case you are curious what, specifically, I'm ripping off here.

Finny's Cashmere Cuff
Yarn: 1/3 skein Lana Grossa Pashmina
Needles: 1 #5 10" Circular, Tapestry needle
Notions: 3 buttons

Cast on 32 stitches (or in a mulitple 4 stitches to fit the length of your neck.)

Row 1 (RS): *K2, p2; rep from* to end
Rows 2-6: Rep row 1
Rows 7-12: *P2, k2; rep from * to end
Rep rows 1-12 until piece wraps snugly (and comfortably) around your neck with about 1" overlap.

Knit buttonholes:
Starting with the next K2,p2 section (Row 1), follow the pattern for 2 rows
Row 3 (RS):*K2, p2, k1, yo, k1,p2, k2, p2, k1, yo, k1, p2, k2, k1, yo, k1, p2, k2, p2, k2
Row 4-6: follow the pattern
Row 7-12: *P2, k2; rep from * to end

Cast off. Weave in ends.

Attach buttons:
Place buttonhole end over other end to fit snugly around your neck when buttoned. Use your tapestry needle to poke through buttonhole and mark spot to sew the button on the other side. Using cuff yarn, sew on three buttons to fit through buttonholes when worn.

You're done!

Thursday, March 05, 2009

As if you needed another apron tutorial [TUTORIAL]

Look, I know there's a bajillion how-to-make-an-apron-from-a-towel tutorials out there, so I realize I'm not bringing anything new to the table, but I hope you'll still appreciate that I was finally moved to make one of these things and it's only because my mom is a supah sassy broad.

What?

Historically, I've done a very good job ignoring tutorials of this variety (not that I haven't made an apron or two in my day) because I've never been inspired by any towel to the point where I wanted to wear it around my house.

Call me crazy, but a brown coffee stained dishtowel just does not say, "Fun Home Attire" like, say, an oversized Tshirt from a local event might.

So, the towels have stayed in the kitchen basket, waiting for me to use them for mopping up a kitchen explosion or perhaps tears from when I'm wrestling with some onions. I assume they also get used for drying dishes per their god given name, but that's not my department.

Until last Hanukkah, that is, when my mom removed her censor completely and stopped trying to restrain her inner sassypants. Not that she's not a saucy lady all of the time, but she does a really good job of hiding it behind her "I'm the nicest gal alive" facade.

Needless to say, I didn't inherit this fine and useful trait.

Anyway, in and amongst some very thoughtful and lovely gifts (she knows me real well, this mom of mine), she stowed a spicy kitchen towel bearing a caption that everyone at the Hanukkah party thought was *oh just hilarious and perfect* for me.

Oh tee hee. Isn't that adorable that my whole family thinks I'm a bitch.

I guess the secret's out.

And when I got this thing home and came to terms with the fact that it's not just my blogging friends that know what a snarky bitch I am, but in fact my whole extended family, I decided that I should really own it.

And what better way to own a personal flaw than to wear it on your person? And then maybe wipe some of The Best Sauce Ever. Yep. accidentally across the front while explaining to your neighbors that your mom is actually quite nice but she drinks and then buys silly things that are totally *just kidding* and therefore here I am wearing a towel proclaiming my poor attitude.

Ah yes, our family is very refined.

What I'm trying to say is that this towel moved me to making an apron and now I will show you how I did it because it was really easy and I have used this apron a lot since I made it if only so that I can wear a bad word and a crazy lady's face while I make dinner and drink.

It's what you might call a Life of Balance and Priorities, my friends. Be advised.

And don't worry, this tutorial won't take NEARLY as long as it did for you to read the post so far. Sorry about that.

Finny's Naughty Towel to Apron Tutorial
Print this thing

Materials:
Kitchen towel
1/2" twill tape or ribbon in whatever color
Thread in whatever color
Fabric marker
Fray check

For the record, your towel needn't include swears.

To make:

Hold the towel up vertically (as though you were going to wear it like an apron, right?) and mark one horizontal neck strap line where you'd want one of the neck strap holes to be.

Then mark one vertical line on the side of the towel where you'd want the waist tie hole to be.

Fold your apron in half vertically, matching long edges, and mark the other horizontal neck strap line on the opposite side of the towel.

Along the long side of the towel, mark the other vertical waist tie line so that it matches up with the line you drew previously.

This is so that your neck strap and waist tie holes are equidistant from the edges, centered and all that jazz.

Can't have you all off-kilter and looking crooked in your apron made from a towel, that'd be ridiculous and also confirm everyone's suspicions that all you're doing in that towel is making gin cocktails.

I might have had a G&T *while* I made this. You'll never know.

Now, per the lines you just marked, set down at the machine and sew yourself four buttonholes, one for each line you marked.

I swear it gets easier every time. Really.

For the record, I only fucked up one of my buttonholes this time which is an all-time record for me. Also, no one was bleeding or crying when I was done, which is noteworthy.

With your buttonholes all sewn and happy, take out that twill tape and weave it through the neck strap holes at the top of your apron, starting at the back of one side, weaving through the front and back through the front of the other hole. This will create a little neck strap, which I'm sure you already surmised because you're smart like that.

I broke that necklace. Sad.

Swing that bitch over your head and pin the top corners of the towel back over the straps so that the straps are now contained in a nice little terry channel. At the base of this channel should be your two waist tie holes, so fold the towel corners accordingly.

You can also draw a sewing line to follow, if you're simple like I am.

Sew this channel and backstitch at both ends. This is because you'll be yarding on it when you're putting it on and fitting it, so you don't want any seams ripping free. That shit pisses me off.

Don't ever look at the back of my aprons, mom. Bad things. Bad things.

Once you've sewn the channels, feel free to cut off any extraneous towel. No one will know you took scissors to a fine and thoughtful gift unless you blog about it when you know full well that your mom reads your blog.

Hi mom. Sorry.

Now that you're all sewn and cut, weave your twill tape through the waist hole, through the side channel and up and around the neck holes, just like you'd imagine, and if you need a little help coaxing that tape through there, put a safety pin through one end because that's always helpful.

I always use a safety pin. Remember, SIMPLE.

You can trim the tape to fit and add some fray check at the ends if you're fancy.

Then, put it on and go make a cocktail. You'll need one when you try to explain why your mom "who seems so nice" gave this to you and how you're not really a bitch you just play one on the Internets.

Mmhhmm. Yes. That sounds believable. I'll go with that.

Saturday, April 24, 2010

OYW: If quick releaseness is required [TUTORIAL]

Show of hands from those who imagined this month's sewing project to be a slam dunk.

Go on, put them up there, I'll wait.

FYI: My hand is up and I think so is Kelli's.

Yeah, I thought this month's project was a no-brainer. I mean, yes, I was planning to ditch the leash, bag and bandana from the start, because my dear dog has these things in piles (and baskets and bags andandand) but I was totally planning on making the collar.

Because Jada's collar is, how you say, totally ragged. Not that we don't love it that way, because what says, "I am an active and well-loved puppy dog" like a collar with the decorative ribbon worn right off?

It doesn't say that to you? Oh, well, it does to us. Whatever. We like worn out things I guess. Good thing for Bubba! Ha!

Sorry, bad joke.

Anyway, I thought it might be nice to have a new dressy collar for Jada for when we take her to dog daycare for a long stay or my folks' for the next get together so that I don't get the, "What? You can't afford a proper collar for your dog? Look at this shamefulness. Poor girl. Like she's homeless."

It goes on, I assure you.

Anyway, I thought I'd make her a dress collar for those times when people who share your ragged=unloved sensibilities will be interacting with our fair pooch.

Except when I went to make the collar from this set I realized OH BOO it's a Martingale style collar which, while lovely, is not allowed at dog daycare because they need all dogs to be on Quick Release alert at all times for whatever reason. I guess sometimes they get tangled in their dog wrestling and, if some collars aren't quickly released, the wrestling-induced neck-to-neck tangle can cause a total brawl.

I see their point.

But, what am I supposed to do with this month's project? Ditch it? Go to Petsmart and *GASP* buy her a new collar?

Huh, no.

Instead I thought I'd go with the theme of the collar and just make it quick release (and thus adjustable) style and then share with y'all my methods so that if you have an equally forward-thinking dog daycare to which you take your beloved pooch OR you want to make a collar that's adjustable, you'd have the option.

Don't ever tell me I'm not a giver because LOOK I'm giving right now. Specifically, a tutorial.

Adjustable Quick Release Dog Collar
Measurements for a medium-sized dog (40-65 lbs)
For a small dog - adjust all measurements to 5/8" and the fabric to 1.5'x2"
For a huge dog - adjust all measurements to 1.5" and the fabric to 2.5'x6"

Materials needed:
1 1" Parachute buckle
1 1" Strap adjuster
1 1" D ring
1 2'x4" piece of fabric
Coordinating thread


To make:


Make the strap
First cut your fabric to size and then fold in half lengthwise and press.


Open up the fabric and fold in the long sides to the center and press.


With long sides folded in, fold in half lengthwise again and press.


Pin in a few spots just to hold it together and topstitch around all sides, folding under and sewing the raw ends.


Add the accessories
With the strap adjuster and the fabric facing right side up, weave the strap through the front slot of the slider, back over the center bar and under the back bar.


Using a box stitch, permanently attach the strap to the adjustable slider.


With the male end of the parachute buckle, start with the other end of the strap and weave it, right side down, up through the front slot of the buckle, back over the center bar and under the back bar. The right side of the fabric will now be facing up.


With this same end of the strap, weave it back up under the adjustable slider's front bar, over the center bar (which has the other end of the strap permanently attached) and under the back bar of the adjustable slider. 


This is what makes the collar adjustable - just slide the fabric through the adjustable slider and move the male end of the buckle to take up or let out the slack.

With the free end of the strap, slide on the D ring and then the female end of the buckle so that the rounded side of the D ring is on the right side of the fabric.


Fold over enough of the end of the strap so that it covers the flat side of the D ring with about an inch or so to spare.

Sew as closely as possible to the buckle's back bar (I used my zipper foot so I could get close without having the foot resting on the plastic bar because I *justknew* it would break if I didn't).


Then snug the flat side of the D ring up against the seam you just made and (still using your zipper foot if you're anal like me and aren't you all?) sew as closely as possible to the D ring without hitting it with your needle because I don't have to tell you that it will break your needle TEE FUCKING DAH.


Not that this happened or anything.

Box stitch the end of the strap to the main part of the strap on the wrong side.


You're done. 

Put it on your dog, adjust to fit (two fingers between puppy's neck and the collar) and, like, take them to your parents' house where they won't ridicule you for being a neglectful dog mom.


OR go to dog daycare where they will allow Puppy in without delay due to their quick releaseness. Yay.


And then contemplate not calling all dogs, young and old, "Puppy" because you think it's starting to annoy Bubba.

I mean, look, I'm a dog person. I love dogs. And, to me, all dogs are "puppies". Perhaps this is the canine version of people who call all people "kid" even if they're, like, in their 60s. I DON'T KNOW.

Anyway, go make your dog less ragged and maybe make this month's other project if you don't care for the sewing one even with the fabulous tutorial I just GAVE YOU because I'm so supernice like that.

xo
Finny