Showing posts sorted by relevance for query tutorial. Sort by date Show all posts

Monday, March 16, 2009

Tutorial Tutorial [Tutorial]

What? You're confused already? Come now, friends. Let's learn us somethin'.

So, I'm writing a Tutorial Tutorial upon request, since my ways are a little mysterious and doesn't everyone just want to get to the bottom of what the F I'm doing with my tutorials and how do they get PDF'd and linked up and why do they look like that and how.

Don't they?

Well, some people who emailed me do, and that's enough for me. And if you happen to be one of the people that thinks my methods are full of shit, feel free to skip this post and come back when I'm talking about mixing cocktails or something.

Onward!

To give you a little background (because I can't just give you the skinny without a really long ass story first), I was posting these tutorials/recipes/planting instructions and using other people's tutorials/recipes/planting instructions and all the while I was annoyed because in order to take them to the sewing machine/kitchen/garden/etc with me, I would have to print them out and it would always take a billion pages to print and that is wasteful and stupid. Plus then I'd have this stack of papers for one friggen tutorial that could really have been condensed onto one page.

So, sometimes I would open Word, like it was 1997 in my house, and copy/paste the whole business onto a page so that I could condense it myself. Then I'd print the one page and be happy that I only had one page, but pissed that I had to spend all that extra time.

ANNOYING.

When I started creating my own tutorials here, because I'm self-involved and imagine that people want to make things that I invent in my pea brain, I decided that I wasn't going to be that Annoying Tutorial Guy anymore, and actually provide tutorials in a format that begets printing/transporting elsewhere.

Because as green and helpful as it may be to just say, "take your computer with you to the kitchen when you go blending up a vat of tomato sauce", I think we know that it's not happening.

At least not for me. I don't have a place in my kitchen that would keep my laptop safe from hot splattering messiness, so printing is necessary. I just don't think risking the ThinkPad's life for the sake of one sheet of paper makes any sense. But that's me. You decide how much you value the integrity of your machine.

So, here I am, with printable tutorials, which, if you exist near a printer made after the millennium, you could actually print double-sided and only use one measly sheet of paper. And then, if you're like me (You might be! I'm not the only freak around here!), you can slide that one measly sheet of paper into your crafting binder for future use. And when you go to the machine, garden, kitchen, you won't have to wrestle a stapled stack of crap while you're also trying to tame some aggressive chard.

Now that is nice.

So, how does it work? Yeah, let's talk about that.

Tutorial Tutorial
Print this thing
Materials:
A copy of CutePDF (Free)
Word processing software (I use Word. Imagine that.)
A Google Site (Free)

To make:
Create a PDFd tutorial
Basically, create the layout for your tutorials in Word, including slots for images, materials needed, instructions, header logo, project name, copyright logo, etc. I found the best way to make a template that worked for me was just to write up a tutorial, paste in pictures and move the info around until it all fit onto 1-2 pages and was easily readable/understandable.

This layout, which was based on an actual tutorial, was better than me just sitting there designing an "it looks pretty but never fits all the stuff I need" template, which I've been known to do. In the past. It's all in the past now.

Then save your doc as a template (ex: Template_Tutorial.doc) AND ALSO as whatever the tutorial is (ex: Hoop_Scarf_Tutorial.doc).

Go back to your tutorial and click Print.

BUT WAIT - When you choose the printer to Print your copy, choose CutePDF rather than the HP whaddyacall that lives in your closet. Or whatever.

This will prompt you to name your PDF, which I'd suggest naming the same thing as your .doc. (Ex: Hoop_Scarf_Tutorial.pdf) I have a folder for all my tutorials (docs and PDFs) so they're easy to contain.

That was an added bonus, that last part. Enjoy.

Now you have a PDF of your tutorial, so no matter who opens it and no matter what kind of machine they're using (Hi, Mac people. I know you're there.) your document will look just the way you saved it. As long as they have Adobe Acrobat. Which they should. Unless they actually DO live in 1985, which I realize is still a possibility. Albeit a shameful one.

So, now you have a tutorial and a template and the tutorial has been PDF'd. The magic! But how do we get it out to the clamoring masses?

Google, der.

Create a Google Site (*You'll only do this the first time around.)
*If you don't have a Google Site yet, you can get one for free as a part of your Google Account, which is also free. In fact, everything Google is free, which is lovely.

*Enough pimping, just go to sites.google.com, and if you're already signed in to your Google Account (if you're signed into Gmail, you're already in), you'll get a "Welcome to Google Sites" page with a friendly little button to "Create a new site".

Why are we creating a whole website right now? Well, we're not. But we are creating a place for your fancy ass PDFs to live so that you can link to them from your blog, so stop yer whining.

*Click "Create new site" and from the Home page, which is the page to which you'll next be delivered.

Once you've arrived on your new home page, look down at the bottom there to the button that says "Choose File".

Click that. Choose your PDFd tutorial from wherever you saved it. Upload it.

This PDF now appears at the bottom of your home page under Attachments.

Now, if you wanted to, you could make a page here. You could do some designing or get fancy. I have not done this, but that's because I have this blog and, well, that's plenty for now.

Link to your tutorial
Write up your tutorial as wordy and long-winded as you like on your blog/website, using all kind of swears and disjointed storytelling to get your point across.

Then, at some point in your post, offer the tutorial to readers to print. I don't care how you do this, but I just put "Print this thing" right before I launch into my mind-numbing directions and then link it direct to my PDF.

To get the link, just right click on the attachment on your Google Site (it'll say something to the affect of Hoop_Scarf.pdf) and from the menu that appears, click "Copy link address".

Now go back to your blog and highlight, "Print this thing" or whathaveyou, and paste this URL as the link by clicking the "link" button in your blog program or by adding it as the URL in your HTML code.

You know, < href="the link you just copied">Print this thing< /a >? You know.

And then publish your post. Done.

Next time you get a wild hair to post a tutorial, just take an extra 5 to create a new Word doc from your tutorial template (which, remember, you saved as Tutorial Template.doc somewhere on your hard drive) and resave it in the same folder as the new tutorial (ex: Cashmere_Cuff_Tutorial.doc), then print it to CutePDF, upload it to your site and rip the URL for linking from your blog.

And since you're all ginned up and running wild with hyperlinked (there's a good word from 1997) tutorials, you could even add a tutorial menu (or recipes or...or...) to your blog so that people don't have to bloody their knuckles digging through your blog to find them.

Wouldn't THAT be nice? I thought so. See sidebar.

GOOD TIMES.

Just to hammer the point some more, I'll ask you to notice the "Print this thing" link at the beginning of this tutorial. Yes, you can print this tutorial, too. Although I feel like that would be retarded given the lack of splattering tomato sauce involved in creating a PDF, but you make the call.

Soon, we do prizes for this and this.

Friday, February 27, 2009

What tampons? [TUTORIAL & PRIZE]

I think I might have some bathroom issues. Like issues with how the bathroom looks, not how things go down in there.

Don't be nasty.

Like, I used to be irked by the grodiness of the naked trash cans, so I made some nice upcycled Tshirt liners for them, and that helped me deal with that particular bathroom issue: grody trash cans.

But then there's still the issue of the HELLO! I'M A BOX OF TAMPONS RIGHT HERE!, which is almost as annoying. Not that it's grody to see a box of tampons in a bathroom, but it just seems, well, so OBVIOUS HELLO and plus, whose bathroom decor matches teal blue and yellow?

Yeah, not mine.

(And don't just go matching your bathroom to your tampons, that's bizarre.)

So, because I like to create things to make pretty other things in situations where prettying is probably not necessary, I set out to make a not-obvious tampon storage device to un-ugly the teal and yellow box lurking near the trash can in my bathroom.

Because I guess I just couldn't go on another day with that box hanging out there behind the trash can just being all teal and yellow and HELLO! TAMPONS! in my black, white and beige bathroom (aren't I the lively decorator) and just had to find a way to conceal it so I could take My Crazy to a different room in the house.

Again, scary look inside my head. Apologies.

But, if you share this particular nugget of Crazy and would like to soothe it with a quick project that you can probably source from thisnthats around your house, try it out. Really, this thing took no time and barely any fabric, math or patience.

Perfect.
Covert Bathroom Storage
(I get it. Not everyone is YAY! for tampons.)
Print this thing
Materials:


1 8.25" x 23" piece of cotton fabric
1 wire hanger (I recycled a white dry cleaner hanger)
1 30" package white or coordinating 1" Velcro (you won't use the whole package)
Coordinating thread
Scissors
Pins
Wire cutter
Fabric marker

To make

Make the box:
Fold your fabric in half, wrong sides together, matching short edges. Sew the long sides, creating a pocket. Place a small dot 2" up from the bottom on both long sides of the pocket.


Fold pocket in half vertically, so that seams run up the middle of the pocket and bottom corners point down into triangles. (You create the triangles by pushing up at the middle of the bottom of the pocket and folding the corners down.)

Pin through all layers to keep this in place.

Sew a straight line across the corner, lining up your stitching with the mark you made in the previous step.

DON'T SEW BOTH FOLDED DOWN CORNERS TOGETHER.

Fold one corner flap up and sew the first line, then flip pocket over and, holding up the now-sewn corner, sew the other corner, lining up your stitching with the market you made in the previous step.


Turn your pocket right side out. Those folded corners now fold down inside the pocket to form a box.

Fold over about 1/2" at the top of the box and sew to create the top hem.


Make a small cut in the center of one of the long sides of your hemmed box top and zigzag stitch around the cut to keep it from fraying later.


Attach the Velcro
Separate your Velcro and line the short end of one of the Velcro sides up with the cut you made in the top hem.

Keeping the Velcro lined up with the top edge of the box, sew Velcro along the top edge of the box completely.

With the corresponding strip of Velcro, add about 1/4" space below bottom edge of top Velcro and sew this strip below the top strip of Velcro so that when the top of the box is folded over, the Velcro will match up.

Fit the hanger
Using your wire cutters, cut the bottom rung of the hanger off by making two cuts before the wire begins turning toward the bottom rung.

Straighten out the wire completely, leaving the hook intact.


Lay hanger on box and line hook neck up with the notch in the hem.

Begin bending the straight part of the hanger so that it will turn the corner at the edges of the box when the hook neck is centered over the notch.


Then, using the box as a guide, bend the arms again, forming a rectangle.


Place one hand over the rectangular portion of the hanger and, with your other hand, bend the hook upward, toward the rectangular portion of the hanger.

My hands look all manish here. I don't know why. They're very shrimpy in real life.


Holding the rectangular portion and neck still, twist the hook so that it points away from the rectangular part of the hanger.


Fit the bag
Hold the hanger with the neck at the notch in the bag and fold the top of the bag over to stick to the corresponding Velcro on the main portion of the bag.


Rework the bends in the hanger if necessary and add your accessories.


Then hang it on the trash can (underneath the liner, obviously) next to the toi and admire your great covertness.


You're like 007 of the bathroom!

And now we can pretend like it's not all HELLO! TAMPONS! back there. Or whatever you hide behind your trash can.

Oh, about that prize...See, I already made one of these deals a while ago, but my camera died half way through the tutorial making process, so I never posted it, and then had to make it again (this time) so that I could post a tutorial.

So, now I have two of these covert wonders and only one bathroom (sad). So - if there's anyone out there who'd like one of these things, but doesn't have the desire to craft one, you're welcome to it. Just leave a comment like, "I want your tampon box!" or whatever, and I'll pick one person with the random name generator thingee to receive it.

Sound good? And don't worry, the one you see in the photo is actually the one I made the first time, so the one featured in this tutorial has never actually seen any bathroom time. In fact, that's a new box of tampons in the picture, so those hadn't even gone into the bathroom at the time of the photo. What I'm saying is this storage box doesn't have any toi cooties or anything, so don't be afraid or start anti-bacterializing yourself. It's safe.

OK, that's enough about my bathroom for now.

And also please notice the "Print this thing" link at the beginning of this tutorial and on some of my other tutorials and also along the sidebar there. Yeah, right there.

This is so you don't have to, like, set laptop near your sewing machine or, lord help us all, print out my entire mind-numbing wordy blog post just so you can make a bag for your tampons.

I mean, really now. That's something a crazy person might do.

Thursday, October 30, 2008

My powers for evil [TUTORIAL]

Leave it to me to, once again, dream up (with Bubba's help, I can't take the credit entirely even though I want to) a Halloween costume that's *so easy* only to find that the crucial accessory I know totally exists is impossible to find.

Even though I KNOW it totally exists somewhere. IT MUST.

But still, I couldn't find it. And I searched the Internets to the bone. Plus also the Spirit store and all the stupid "Halloween Headquarters" party stores that say they have every Halloween thing, when in fact, they do not. Clearly. Because this THING exists. And yet, they don't have it. Jerks.

Let me explain.

Nearly every year since all my friends started getting married (this preceded the onslaught of All My Friends Are Having Babies that you read about now), I've tried to come up with Halloween costumes that allowed me to use one of my *not free* bridesmaid dresses as the featured item.

Because, really, when in all of my days am I going to have the occasion to wear a full length red satin gown with a wrapped and bejeweled bodice? Or a two piece green taffeta number with awkward and mean boning? Or a tea length (what does this even mean?) pink dress with sheer overlay? When I ask you? Only on Halloween, my friends. Despite what I was lured into believing before I actually saw all of these dresses in person.

You know what I mean here, too - the ol', "Oh! You'll love it! You can totally wear it again!" speech you get before you go into the barfy bridal shop to try on your hideously overpriced bridesmaid dress that you SO will not EVER be able to wear again because you don't go to prom anymore or, like, any other events that call for rhinestones BUT WHATEVER.

And then this happens to you five whole times in a row and you decide that you are going to get an extra wearing out of each one of these babies by gently wearing them for Halloween before donating them all to The Princess Project.

Oh! And it's so fun and easy, too because you already have the piece de resistance in the form of a perfectly fitting formal gown so WOW won't it be easy to just pull together a few accessories and VOILA be, say, The Tooth Fairy!

Scratch that, The Evil Tooth Fairy.

Yes, we like some evil to balance out our Fairy around here.

All I'll need, in addition to my fabulous pink tea length (!) dress is a pair of pink wings, a crown, some Jolly Roger accessories, a menacing operator's apron, a bloodied pair of pliers and some loose teeth.

So, yeah, loose teeth don't exist in the free world. Not even on the www's. And not even in the "Halloween Headquarters'" of the larger SF Bay Area during my lunch hour.

Thankfully, I lurked around town for these teeth (just try asking for loose teeth at a store and see the kind of reactions you get) with a good friend of mine who has greater gory vision than I, so when I was just about to strangle myself with a plastic replica Indiana Jones bullwhip, she offered up the perfect suggestion: mini marshmallows.

Crack the bag, let them stiffen up a little and then mold them and bloody them to look like freshly extracted molars.

WHY YES I WILL DO THIS.

And this is where my evil tutorial comes in. Because if this tutorial had existed one week ago today, I could have saved myself a lunch hour(s) of skanky looks as I asked clerks at HALLOWEEN STORES where they had the display of loose and bloody teeth. Because they weren't standing right next to a disemboweled torso with flashing intestine accessory or anything so obviously *I* am the ridiculous one.

People - BE AWARE OF YOUR SURROUNDINGS. I'm just saying.

Tutorial: How to make bloody teeth in a pinch


Materials & Equipment
1 mug of hot water
1 bottle of gel blood
1 bag of mini marshmallows (stiff)
1 toothpick or kebab skewer or other pokey device of your choosing
Newspaper or some other cover for your work surface


To make

Float your bottle of gel blood (with the cap on for godssake) in the mug of hot water for a few minutes until the gel is no longer gel, but liquid goo.


Take your poking device (I used a wooden skewer) and, with the flat end, press a nice dent into each end of the marshmallow.


Now, take your gel blood from its warm and cozy bath and drop a glob of your liquid goo into one of the dents.


Then turn the tooth (I don't want to have to type "marshmallow" anymore, it's got a lot of letters) on its side and, with the pointy end of your skewer press a dent from end to end of your tooth while pressing one of the ends together with your fingers.


Turn it over and do this to the other side, too.

Let the gel dry and then do a hundred more because they're fun and, really, who doesn't need a hundred bloody little teeth? No one, that's who.


Now you can string them on a necklace (I find that stretchy gold cord you get from boxes of candy works nice) or rig them up to dangle from earrings or just let them roll around loose in your clear vinyl operator's apron for effect. Or whatever you see fit to do with a hundred loose and still sorta squshy bloody teeth. I won't ask.

Happy evil, y'all.

Thursday, March 05, 2009

As if you needed another apron tutorial [TUTORIAL]

Look, I know there's a bajillion how-to-make-an-apron-from-a-towel tutorials out there, so I realize I'm not bringing anything new to the table, but I hope you'll still appreciate that I was finally moved to make one of these things and it's only because my mom is a supah sassy broad.

What?

Historically, I've done a very good job ignoring tutorials of this variety (not that I haven't made an apron or two in my day) because I've never been inspired by any towel to the point where I wanted to wear it around my house.

Call me crazy, but a brown coffee stained dishtowel just does not say, "Fun Home Attire" like, say, an oversized Tshirt from a local event might.

So, the towels have stayed in the kitchen basket, waiting for me to use them for mopping up a kitchen explosion or perhaps tears from when I'm wrestling with some onions. I assume they also get used for drying dishes per their god given name, but that's not my department.

Until last Hanukkah, that is, when my mom removed her censor completely and stopped trying to restrain her inner sassypants. Not that she's not a saucy lady all of the time, but she does a really good job of hiding it behind her "I'm the nicest gal alive" facade.

Needless to say, I didn't inherit this fine and useful trait.

Anyway, in and amongst some very thoughtful and lovely gifts (she knows me real well, this mom of mine), she stowed a spicy kitchen towel bearing a caption that everyone at the Hanukkah party thought was *oh just hilarious and perfect* for me.

Oh tee hee. Isn't that adorable that my whole family thinks I'm a bitch.

I guess the secret's out.

And when I got this thing home and came to terms with the fact that it's not just my blogging friends that know what a snarky bitch I am, but in fact my whole extended family, I decided that I should really own it.

And what better way to own a personal flaw than to wear it on your person? And then maybe wipe some of The Best Sauce Ever. Yep. accidentally across the front while explaining to your neighbors that your mom is actually quite nice but she drinks and then buys silly things that are totally *just kidding* and therefore here I am wearing a towel proclaiming my poor attitude.

Ah yes, our family is very refined.

What I'm trying to say is that this towel moved me to making an apron and now I will show you how I did it because it was really easy and I have used this apron a lot since I made it if only so that I can wear a bad word and a crazy lady's face while I make dinner and drink.

It's what you might call a Life of Balance and Priorities, my friends. Be advised.

And don't worry, this tutorial won't take NEARLY as long as it did for you to read the post so far. Sorry about that.

Finny's Naughty Towel to Apron Tutorial
Print this thing

Materials:
Kitchen towel
1/2" twill tape or ribbon in whatever color
Thread in whatever color
Fabric marker
Fray check

For the record, your towel needn't include swears.

To make:

Hold the towel up vertically (as though you were going to wear it like an apron, right?) and mark one horizontal neck strap line where you'd want one of the neck strap holes to be.

Then mark one vertical line on the side of the towel where you'd want the waist tie hole to be.

Fold your apron in half vertically, matching long edges, and mark the other horizontal neck strap line on the opposite side of the towel.

Along the long side of the towel, mark the other vertical waist tie line so that it matches up with the line you drew previously.

This is so that your neck strap and waist tie holes are equidistant from the edges, centered and all that jazz.

Can't have you all off-kilter and looking crooked in your apron made from a towel, that'd be ridiculous and also confirm everyone's suspicions that all you're doing in that towel is making gin cocktails.

I might have had a G&T *while* I made this. You'll never know.

Now, per the lines you just marked, set down at the machine and sew yourself four buttonholes, one for each line you marked.

I swear it gets easier every time. Really.

For the record, I only fucked up one of my buttonholes this time which is an all-time record for me. Also, no one was bleeding or crying when I was done, which is noteworthy.

With your buttonholes all sewn and happy, take out that twill tape and weave it through the neck strap holes at the top of your apron, starting at the back of one side, weaving through the front and back through the front of the other hole. This will create a little neck strap, which I'm sure you already surmised because you're smart like that.

I broke that necklace. Sad.

Swing that bitch over your head and pin the top corners of the towel back over the straps so that the straps are now contained in a nice little terry channel. At the base of this channel should be your two waist tie holes, so fold the towel corners accordingly.

You can also draw a sewing line to follow, if you're simple like I am.

Sew this channel and backstitch at both ends. This is because you'll be yarding on it when you're putting it on and fitting it, so you don't want any seams ripping free. That shit pisses me off.

Don't ever look at the back of my aprons, mom. Bad things. Bad things.

Once you've sewn the channels, feel free to cut off any extraneous towel. No one will know you took scissors to a fine and thoughtful gift unless you blog about it when you know full well that your mom reads your blog.

Hi mom. Sorry.

Now that you're all sewn and cut, weave your twill tape through the waist hole, through the side channel and up and around the neck holes, just like you'd imagine, and if you need a little help coaxing that tape through there, put a safety pin through one end because that's always helpful.

I always use a safety pin. Remember, SIMPLE.

You can trim the tape to fit and add some fray check at the ends if you're fancy.

Then, put it on and go make a cocktail. You'll need one when you try to explain why your mom "who seems so nice" gave this to you and how you're not really a bitch you just play one on the Internets.

Mmhhmm. Yes. That sounds believable. I'll go with that.

Tuesday, February 16, 2010

Auto-filling birdbath [TUTORIAL]


I feel like I should prepare you appropriately for this post because, after reading it, you will know the true depths of my laziness.


And it's DEEP. My laziness.


So, like, prepare yourself. Sit down or get a glass of water to splash on your face or something.

Over the weekend I was lying on the patio with the dog, so I could soak every bit of warmth from the pavers into my winter-chilled soul as possible, all the while watching Bubba pick through our demolished lawn area for remnants of Bermuda grass in his never-ending battle against their prolific rhizomes.

So, the scene is me and the dog lying prone on the patio staring at a sweating Bubba as he shovels and turns about 300 square feet of ground OVER AND OVER looking for signs of live Bermuda grass.

He's dirty, sweaty and on a mission to improve our lives. I (and the dog-don't forget her free-loading ass) am pleasantly warmed by the mid-winter sunshine, burning zero calories and, like, half asleep.

Obviously this is when a great idea dawned on me for which I would need Bubba's help. Because, you know, he's not already busy or anything.

And the great idea involved my old broken and discarded birdbath which I've been reluctant to get rid of because it's solid copper and has begun to age nicely and develop this pretty patina that I feel would be out of place in a dumpster or recycler.

Those places are not the homes of designer decor, after all.

But, despite much thinking on the subject (mostly during times like this, where I'm lying on the ground doing a big hot nothing and Bubba is doing useful things), I hadn't been able to come up with any good ideas for the now-detached-and-impossible-to-remount copper bowl or prong-mounted stand it used to sit atop.

I'd just gotten so sad about it that I'd thrown it between the garage and fence so I could slowly and gently forget about my shame.

I mean, I'd thought about putting just the bowl out into the landscaping, filling it with water, and calling it a birdbath, but then I realized that I'd have to fill it with water all the time to keep the birds interested, but not ever let any water go stagnant lest the mosquitoes become interested and then kill us with their malarial cooties.

And, lord knows, I'm not dragging out the hose every muther effing day just to fill a birdbath.

So, my final reasoning was this: Birds don't need proprietary baths. That's why there's rain.

Are you seeing My Lazy winning out here? It always does.

This was convenient reasoning because it meant that I wasn't going to have to interact regularly with our garden hose to strike a careful balance with the water levels in the bowl enough to keep the mosquitoes at bay meanwhile keeping the birds happy in their special bath. It also meant I could continue being lazy.

Though it did mean that the disenfranchised birdbath parts were going back into the void between the garage and fence and that, likely, one day they were going to make their way into a landfill or recycle bin and that still made me sad.

Until this past Saturday when, during a moment of purposeful lying around (see above), the answer dawned on me and spurned the tutorial you see below.

And while this may not seem like an exciting moment for you (what? your life is so glam?), in my world it was like Mardi Gras.

So, how did I solve this conundrum of the birdbath that manages its own stupid self and lets me save an old yard relic from the recycle bin?

(Heads up, this is where the tutorial starts)

By first digging out the discarded bowl from the void, turning it upside down and vaguely locating the center.

By drilling a hole in the bowl's center with a 1/2" drill bit.

(It's the big one here)

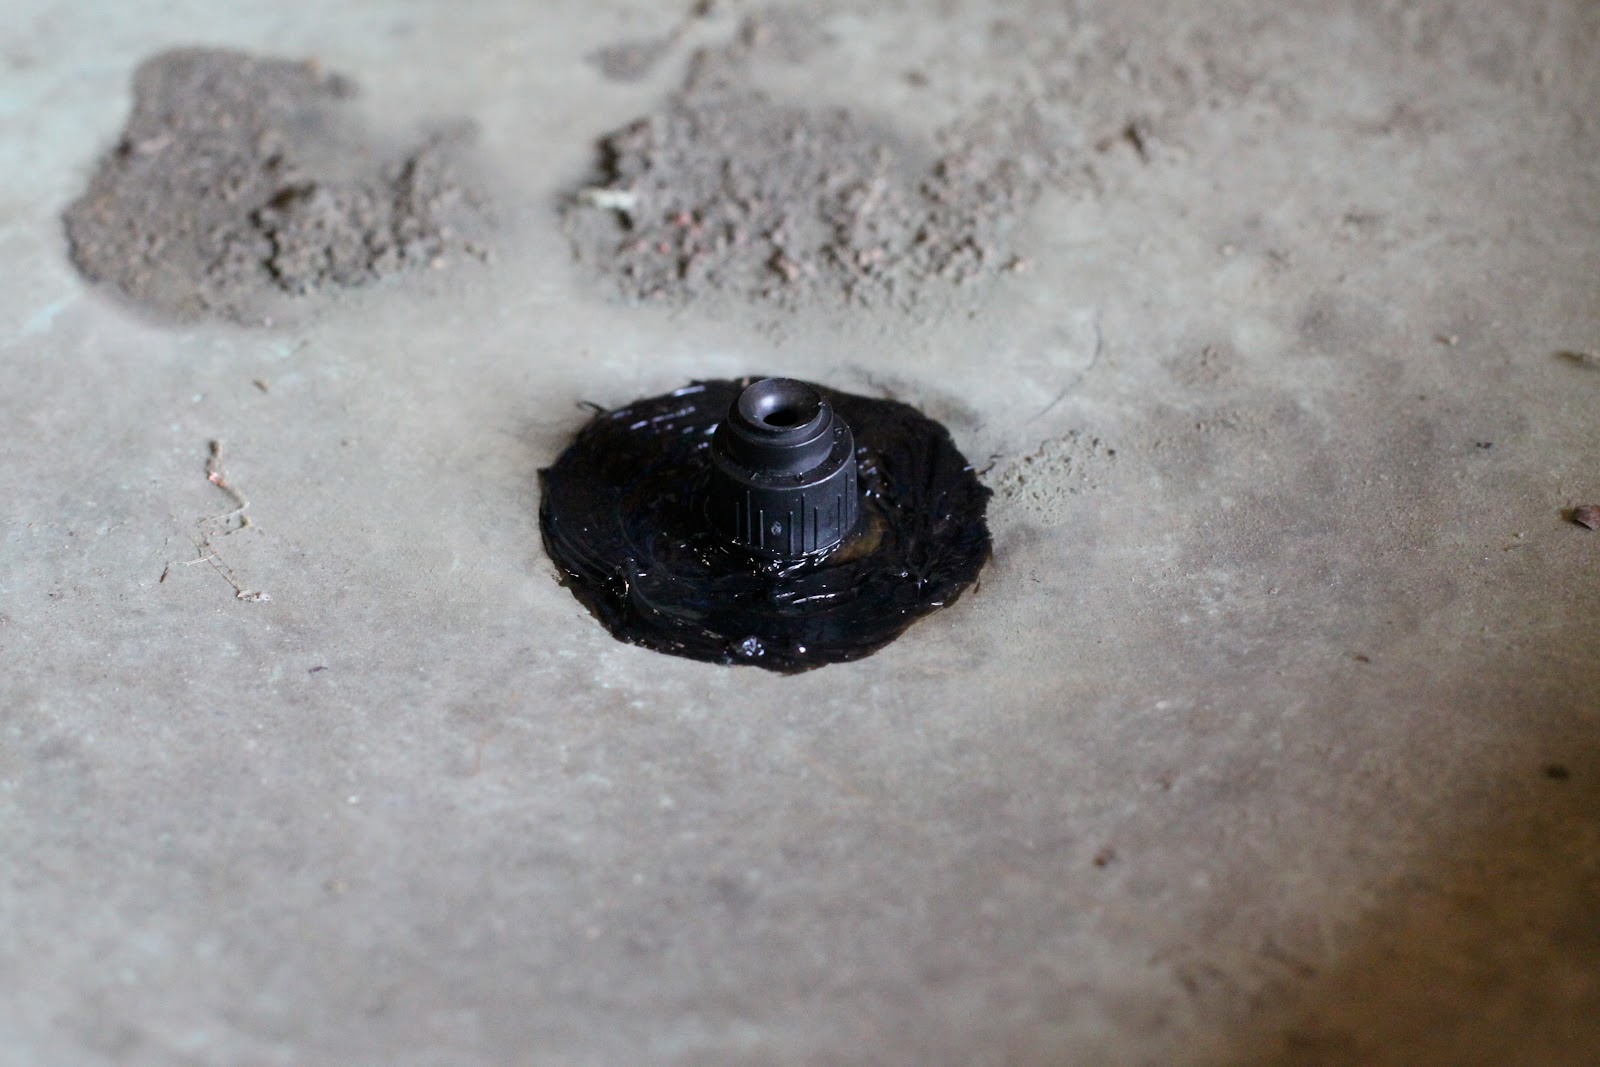
Inserting a sprinkler sans cap.

(All that goo you see is actually remnant Barge from a previous failed attempt to fix the thing)

Sealing the hole with silicone sealant.

(Yeah. It's dirty. It's been next to the garage for 4 years. What do you want?)

Letting the sealant cure for 24 hours.

Screwing on the adjustable sprinkler cap.


Running a 1/4" sprinkler line from an open line on one of the sprinkler manifolds to the new site of the birdbath.

Attaching said line to the sprinkler mounted bowl.

Jamming the sprinkler spike into the ground.

Adding some decorative stones from many years of beach combing.

(Notice the one in the middle that's not a stone. I am so sneaky.)

And letting the regularly scheduled sprinkling fill the bowl without me having to do anything else.

(Those disks are a cork I sliced up to give the bees somewhere to sit while they drink so they don't drown.)

Ever.

This guy keeps an eye out for predators. I guess. Mostly it's just funny to have an army man in the birdbath.

So now, three days a week, while the yard is being efficiently drip irrigated, the birdbath will fill with water enough to bathe the birds while keeping it active enough to ward off mosquitoes trying to lay their filthy eggs while I do a big fat nothing.

Which, I think I've proven, is exactly what I prefer to be doing at all times.

Yay.

Friday, December 18, 2009

Not a $20 Bill Mini Wallet [TUTORIAL]

Yeah, so, you know how when you go out with the three dimensional people for activities like drinking in a bar or drinking in a house or drinking in a country club because that is where people sometimes have weddings, you might swap out your normal Big Girl Purse for, say, a smaller more demure clutch?

Or maybe you're one of those whores who just ditches the purse and shoves all your necessaries down your cleave or maybe in your back pocket if you're wearing jeans loose enough to accommodate a layer of plastic.

And you're faced with that moment of What the Fuck Do I Do With My Credit Card and ID and this $20 bill just in case some rube bar doesn't take Visa?

Yeah, you know this moment in the Preparations for Going Out.

And, if you're me or like me or like most bitches I know, you take that $20 bill, wrap it around your ID and credit card and either throw it loose into your clutch or slide it into your back pocket, just tempting fate to come ruin your night by having these crucial items go missing. Or what if they get demagnetized? Does that still happen if the magnetic strips touch? I don't even know.

But, if you've had those moments and you're annoyed by them and you resort to using things like hair bands or binder clips or barettes or complicated currency origami to keep your necessaries together, this tutorial is for you.

Because this mini wallet, which is NOT A $20 BILL (see, worked that name in there so you could make sense of the title. You're welcome.), fits nicely into most clutches and super small purse things as well as your back jean's pocket provided you've left a little breathing space in those 7s for a thin layer of fabric and plastic.

If you're me, this is rarely an option because, friends, my jeans - they are tight. Yeouch.

Anyway, this is not about my questionable attire, this is about making sure that you have the means to pay for all those cocktails and, at a later hour, the necessary snacks and maybe, at an even later hour, some questionable entertainment on one of your city streets with lots of flashing lights - but that's not important. The important thing is that you do it with grace and style.

At least the amount of grace and style that can be garnered while you quickly and easily locate your Visa despite your crossing eyes and half-exposed rear end.

Moving on.

Not a $20 Mini Wallet Tutorial
 

Materials

2x 8x5.25" main pieces from main fabric
2x 6x5.25" pockets from contrasting fabric
1x 4.5x5.25" pocket from contrasting fabric
1x 4.5x5.25" pocket from main fabric


Step 1: Press the pockets


Fold the smallest main piece and two contrasting pieces in half horizontally and press.


Step 2: Sew the pocket piece

Place one of the large main pieces right side up and pin the smaller folded pieces, lining up raw edges and stacking the small main piece on top of one of the contrasting pieces as seen here.

Pressed edges should be to the middle of the main piece.

Sew a 1/4" seam around all edges.

Step 3: Attach the back

Place the other large main piece on top of your just-sewn pocket piece, right sides facing, pin and sew a 1/2" seam, leaving one short side open.

Step 4: Turn right side out
That's all. Just turn the thing you just sewed on three sides ONLY, right side out and press.

OK. So you had to press, but you get it. It's easy.

Step 5: Finish your wallet

Fold in half, lining up short edges, pin in place and sew a 1/4" seam around all sides, being sure to fold in and press the bottom edges for a clean finish.

Step 6: Load it up and hit the bars. Or whatever.
Your ID, credit card (even a non-Zappos one, though I don't know why you'd bother) should fit snugly on one side and your cash should slide in easily on the other when it's folded in half.

Like you can plainly see here.


So, from where I stand, it seems like you're ready to jump off the roof into your awesomest 7s and hit the town without dropping your Zappos card on the dance floor as you attempt an iffy move to show off your quad prowess and/or whale tail.

And don't even be telling me you don't know what a whale tail is because I know you've witnessed them thanks to the Supah Low Jeans trend which has yet to dissipate. Not that I'm not guilty of this horror, I'm just saying, I have rekindled my love with my belt collection and everyone is the better for it.

So, like, wear a belt and carry this wallet and maybe when you're out drinking your face off you'll make less of a horse's ass of yourself.

OH! And if you have a friend who falls victim to this sort of thing, and you still need to make her a gift for the holidays, you could make one of these up real quick like from leftover scraps in your stash and save us all a little eyesore in the new year.

And, if you have a friend that fits into any of the following categories, this thing might be good for them in the following situations:

New mom/Diaper bag wallet
Retired mom/Park walking wallet
Commuter/Laptop bag wallet
Student/Backpack wallet
Dog owner/Dog park wallet (hello, this is me)

Updated!:
Hiker/Don't get lost without your ID wallet
Snowboarder/Lunch costs $50 at Heavenly wallet

Yay.