

I feel like I should prepare you appropriately for this post because, after reading it, you will know the true depths of my laziness.
And it's DEEP. My laziness.
So, like, prepare yourself. Sit down or get a glass of water to splash on your face or something.
Over the weekend I was lying on the patio with the dog, so I could soak every bit of warmth from the pavers into my winter-chilled soul as possible, all the while watching Bubba pick through our demolished lawn area for remnants of Bermuda grass in his never-ending battle against their prolific rhizomes.
So, the scene is me and the dog lying prone on the patio staring at a sweating Bubba as he shovels and turns about 300 square feet of ground OVER AND OVER looking for signs of live Bermuda grass.
He's dirty, sweaty and on a mission to improve our lives. I (and the dog-don't forget her free-loading ass) am pleasantly warmed by the mid-winter sunshine, burning zero calories and, like, half asleep.
Obviously this is when a great idea dawned on me for which I would need Bubba's help. Because, you know, he's not already busy or anything.
And the great idea involved my old broken and discarded birdbath which I've been reluctant to get rid of because it's solid copper and has begun to age nicely and develop this pretty patina that I feel would be out of place in a dumpster or recycler.
Those places are not the homes of designer decor, after all.
But, despite much thinking on the subject (mostly during times like this, where I'm lying on the ground doing a big hot nothing and Bubba is doing useful things), I hadn't been able to come up with any good ideas for the now-detached-and-impossible-to-remount copper bowl or prong-mounted stand it used to sit atop.
I'd just gotten so sad about it that I'd thrown it between the garage and fence so I could slowly and gently forget about my shame.
I mean, I'd thought about putting just the bowl out into the landscaping, filling it with water, and calling it a birdbath, but then I realized that I'd have to fill it with water all the time to keep the birds interested, but not ever let any water go stagnant lest the mosquitoes become interested and then kill us with their malarial cooties.
And, lord knows, I'm not dragging out the hose every muther effing day just to fill a birdbath.
So, my final reasoning was this: Birds don't need proprietary baths. That's why there's rain.
Are you seeing My Lazy winning out here? It always does.
This was convenient reasoning because it meant that I wasn't going to have to interact regularly with our garden hose to strike a careful balance with the water levels in the bowl enough to keep the mosquitoes at bay meanwhile keeping the birds happy in their special bath. It also meant I could continue being lazy.
Though it did mean that the disenfranchised birdbath parts were going back into the void between the garage and fence and that, likely, one day they were going to make their way into a landfill or recycle bin and that still made me sad.
Until this past Saturday when, during a moment of purposeful lying around (see above), the answer dawned on me and spurned the tutorial you see below.
And while this may not seem like an exciting moment for you (what? your life is so glam?), in my world it was like Mardi Gras.
So, how did I solve this conundrum of the birdbath that manages its own stupid self and lets me save an old yard relic from the recycle bin?
(Heads up, this is where the tutorial starts)
By first digging out the discarded bowl from the void, turning it upside down and vaguely locating the center.
By drilling a hole in the bowl's center with a 1/2" drill bit.
(It's the big one here)

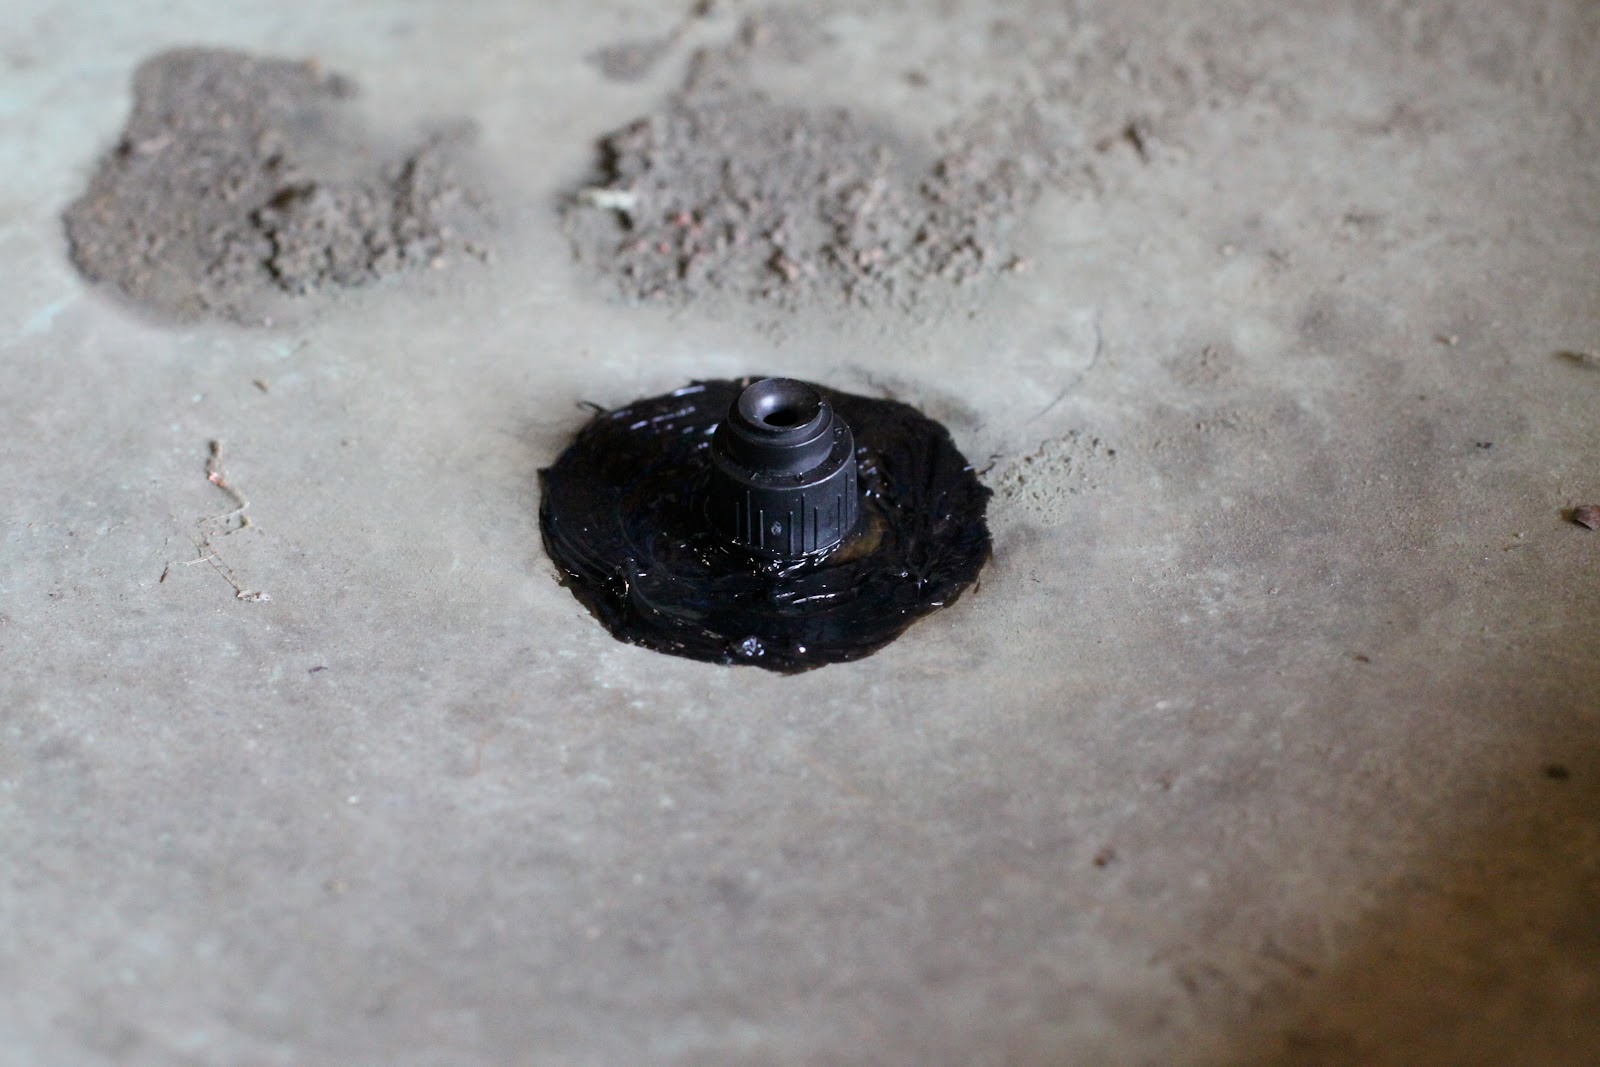
Inserting a sprinkler
(All that goo you see is actually remnant Barge from a previous failed attempt to fix the thing)

Sealing the hole with silicone sealant
(Yeah. It's dirty. It's been next to the garage for 4 years. What do you want?)
Letting the sealant cure for 24 hours.
Screwing on the adjustable sprinkler cap.

Running a 1/4" sprinkler line
Attaching said line to the sprinkler mounted bowl.
Jamming the sprinkler spike into the ground.
Adding some decorative stones from many years of beach combing.
(Notice the one in the middle that's not a stone. I am so sneaky.)

And letting the regularly scheduled sprinkling fill the bowl without me having to do anything else.
(Those disks are a cork I sliced up to give the bees somewhere to sit while they drink so they don't drown.)

Ever.
This guy keeps an eye out for predators. I guess. Mostly it's just funny to have an army man in the birdbath.

So now, three days a week, while the yard is being efficiently drip irrigated, the birdbath will fill with water enough to bathe the birds while keeping it active enough to ward off mosquitoes trying to lay their filthy eggs while I do a big fat nothing.
Which, I think I've proven, is exactly what I prefer to be doing at all times.
Yay.

i LOVE it! what a fun idea - especially the army guy...everyone needs one, right?
ReplyDeleteThe whole idea is great...but I like the army guy the best!
ReplyDeleteExcellent project. Right now, we have one of the drip system gizmos in our birdbath to keep it filled and fresh. Of course that means weird looking tubing running down one edge. I'll have to show my husband your tutorial. Thanks!
ReplyDeleteWhat a great tutorial. It is much better then sending the lovely piece of copper to recycling.
ReplyDeleteUsing the irrigation system is great and effective and only partially lazy. The army man is a wonderful addition to the scene.
Not only do you have an army guy in your bath, you're considerate for bees. Which I hate. I hate bees. I like honey but I'm sure that can easily be made by poor kids in some third world country without bees. ;)
ReplyDeleteGenius. Absolute genius. You scare me.
ReplyDeleteThat is absolutely brilliant! WAY easier than the setup my Grandpa had, where it was actually plumbed with real plumbing and a faucet lever in the kitchen.
ReplyDeleteThe bee corks are such a good idea, too!
That's a great idea! When can you swing by and do one for my yard?
ReplyDeleteAlso, if I were ever to write a book, it would be on the virtues of "purposeful lying around".
ReplyDeleteHmm, it seems that the first comment I left didn't show up. So it looks like I'm crazy by starting my second comment with Also.
ReplyDeleteAnyway, just wanted to tell you you're brilliant and I just suggested this tutorial to Craftzine.
Army man in the birdbath FTW. :)
ReplyDeleteWow. You must really love birds to spend all that time planning and executing a place for them to bathe.
ReplyDeleteAlso, you weren't seriously considering sending copper to the DUMP, were you? Do you have any idea how much copper is worth? You could have started your scrapping career with this bird bath.
But I think your bath is much nicer than a scrapping career. The birds agree.
Not lazy. Just brilliant. (I would be worried about neighborhood cats with a bird bath that low, but I guess Jada keeps them away???)
ReplyDeleteall i have to say is that if you are lazy than i don't even know what to call myself . . .
ReplyDeletelove how it turned out! so impressive. and psychoanalysts over the world knowingly nod their heads at your mind creating these brilliant ideas while your body is lying in supine position. yes.
So clever!
ReplyDeleteOh you are so cool! What a perfectly brilliant solution. And, of course, I love the corks for bees and the army man guarding the bath.
ReplyDeleteI've only discovered you RIGHT THIS VERY MINUTE and have come to the following conclusion: you are comprised of pure awesome. and I love you.
ReplyDeletetoo soon? too fast?
that's what you get for being altogether brilliant and appropriately sedentary.
I will, however, restrain myself and save the "I'm gonna find a way to ensure we're lifelong bff's" declaration until next time. cause, you know, I wanna play hard to get.
i love this project. especially the little man in there....so funny.
ReplyDeletei am starting to think you might be a genius.
ReplyDeleteDoesn't the water drain back out through the sprinkler head???
ReplyDeleteEr...no. The sprinkler emitter is sealed to the drainage hole with silicone, so it doesn't leak out and the water can't drain back into the sprinkler head because it's a bubbler type, so there's no reverse-action going on.
DeleteBut, but, I don't have a sprinker (I prefer to let my lawn go to weeds, apparently). I keep thinking I ought to be able to set up some sort of loop system thing that moves the water through the bowls via gravity. No? Too hopeful? Too lazy?
ReplyDelete