Tuesday, March 30, 2010

Adopt a Crop 2010: The word you're looking for is, 'mace'.

Please enjoy the sombrero shadow. It was very warm and sunny.

So, some of you associated these absurd looking melons with an STD or that spiked ball attached to a big stick by a giant chain that warriors in the olden times used to bludgeon their enemies from Middle Earth, but they are, in fact, just melons.

Though you did give me good ideas for how to dispatch with these melons in the event that I decide they're inedible or just too scary to slice into with the intention of eating (recall the concept of lobbing one across the street at the shirtless shrieking neighbor kids)(who are boys - don't be porny).

Regardless of all that, they've now been planted and so, are beginning a life of luxury in my garden next to their friends, the Georgia Rattlesnake Watermelon who, by some strange turn of events, elicited an even worse reaction when I mentioned it to neighbors and passers-by.

And, yes, I do mention my garden to passers-by because what else do I have to talk about? My sub-60 10K PR? Huh. Not yet I don't. At least not officially. But we'll get to that another day.

ANYWAY.

The African Horned Cucumber Jelly Melon, with its Days to Maturity set at Who The Hell Knows because it's not on the packet, will hopefully emerge sometime between now and October so that we can get to know its ripened fruit in the edible sense. Or at least I can get it acquainted with my yet-neglected juicer who still sits on my sideboard as a juicing virgin because WHOOPSY I haven't gotten around to jamming anything in there yet.

Wow. That wasn't appropriate. Enjoy.

And, not to leave you hanging or anything, but while I was out there sowing these very normal looking not-as-tiny-as-the-packet-would-lead-you-to-believe seeds with the watermelon seeds (which are also normal sized), I planted almost the rest of the garden, too.

Including the tomatoes (!!)

So all told, this weekend was alive with the following gardeningblahblahblah:


Seeds sown:
Purple podded pole beans
Lollo Rosso lettuce
Butterhead bibb lettuce
Mexican Sour Gherkin cucumbers
Pickling cucumbers
Georgia Rattlesnake watermelons
African Horned Cucumber Jelly melons
Nasturtium (lots of kinds)

Seedlings planted:
Better Boy tomatoes (2)(!!)
Sweet basil (2)

Seeds yet to sow:
Cilantro

Seedlings yet to plant:
Toma tomatillo
Black Krim tomato
Jalapeno

Don't believe me?

See. You can tell.

Once I get the lay-about garlic and shelling peas out of bed #3, the Yet To Be whatevered vegs will go in. After a turn with the soil amending, of course.

And then I can really heave a huge sigh of relief and sit back to enjoy the world shifting back into balance because you know I get all biggigity while the garden sits empty. I require growing vegetables! It rights the wrongs of the world!

I get very dramatic at planting time.

Which, thankfully, can be swiftly dealt with by way of beautiful weather (hi, I love you high-70s), bare feet, shorts, freshly cut lilacs (thanks awesome neighbors), our first outside dining experience courtesy of Bubba and his grilling skills, blackberry crisp from last year's frozen bounty and good wine-soaked friends draped about our firepit under a full moon.


Oh yes, the world's wrongs are being righted as we speak.

Friday, March 26, 2010

Half a meadow + everything that's not vegetables.

How about before this turns into a LOOK AT THESE VEGETABLES DOING THINGS blog for the next six months, I show you the first results from last fall's efforts to turn my front yard into a drought tolerant meadow?

OK, let's do that.

But remember, like most things in the gardening world - this is an ongoing process. I'm imagining it will take a few seasons of, "Hey, there's an empty patch, let's put something there." before it gets all filled in and truly meadow-like.

So, I just say that because I don't want any to hear any beef about the bald spots that were supposed to be all covered with bushy meadow grass by now what happened is it dead? Because I don't need that kind of pressure in my life, oh beloved neighbors who I try to imagine are just being constructive and interested.

Sheesh. Go mow your water-sucking lawn and leave me to my bulbs.

Anyway - I'm OK with how my future meadow is progressing so far, and since I know that we won't have to mow ever again, that makes it all the better.


So, obviously, given these photos, the $.99 landscaping I did has proven again to be well worth my time. All 30 seconds of it that I spent dumping out a few packets of wildflower seeds and kicking dirt over them with the toe of my flip-flop.

The sidewalk patch has never looked finer and now I'm starting to wonder if I should have just taken that approach on the entire front yard except that I know how barren it gets around, say, December, and I doubt our neighbors would enjoy the dirt hole of our sidewalk patch extended across our entire front yard.

No, that'd be ugly. And I'd be ashamed. But only if it were the whole front yard. The dog pee hole though? That can go ahead and look shitty for three months out of the year and I won't give much of a crap. I mean, what do I expect from a dollar's worth of seeds? A year round cutting garden of Eden?

No.

I just expect it to look passable for most of the year while I don't water it or do anything other than point to it and go, "HA! 99 cents. That rules." as I go on about my life. Also, sometimes I get excited about the poppies and take photos like those you see above, BUT THAT'S IT.

I don't want more commitment than that with a sidewalk patch that's not "technically" mine in the first place, according to the City of San Jose.

Alright, now that we've paid heed to the front yard's shenanigans, I'll give you a quick run-down of what the backyard is doing to get my attention before all of my eyes are on the vegetables until October.


Much to my relief, the potatoes (top left) are actually sprouting in their old tires, so all that time they spent getting wrinkly and pathetic-looking on my counter wasn't a complete detriment to their ability to grow. Phew. I still have no fucking idea what I'm doing with the potatoes (help - when do I put more soil on them? Now?), but they at least appear to be alive. Yay.

Much to Bubba's relief, the apple tree (moving right through the photos) is making another effort at growing this year - its second year in our yard and its first overwintered spring - and that's good because if the apple tree croaked ohmigawdIdontknowwhatwewoulddo.

Some daffodils are blooming still - which was a surprise because I thought we were done after the white and yellow ones, but SURPRISE, there were some of my favorite variety just waiting to sprout up and get trampled by the dog. For the record, I favor the ones with the orange centers because, well, I like orange. So there's that.

The cherry tree, which I love with the rest of my heart that's not dedicated to loving tomatoes (there's some room left over), is blooming enthusiastically which pleases me greatly and causes my neighbors (who gave us the tree) to warn us about stealthy thieves who've been known to sneak into people's gardens and leave holes where, previously, there were healthy blossoming cherry trees. They're such jokers!

I have installed locks, though. Just to be safe. (Kidding)

On the patio, totally minding its own business since I raped it of all of its lemons a month ago, is the dwarf Meyer lemon just blooming its little heart out. Which is incredible given the horrible shearing I gave it a few years back, from which I thought it would never recover. Yikes. When I think about the pruning that poor tree took...*shudder* Anyway - it has about five hundred blossoms on it right now and PHEW. Plus, it smells rully nice.

Yarrow. It's fuzzy. And the two new plants I put in, like, five minutes ago, are already blooming. And you don't really care so let's just move on.

Strawberries! They're alive! Which is no small miracle since, a few years back, I nearly pulled them from the veg beds before their time to throw them away because I didn't know that strawberries are perennials. Oh. Thank you, mom, for letting me in on that little secret in time to save these very happy plants from certain death. Now they are happily growing in the landscaping, where they won't be chucked into the composter by a retarded gardener (moi), but will probably be napped upon by our dog who is a total plant napper.

And, according to the photo collage (which isn't as handy as I'd imagined since I've had to do all this elaborate referencing that's starting to really annoy me), we're back at the cherry tree now, which is in full bloom and YAY because maybe this year we'll pull more than a pound of cherries from it so I can make things like pie.

And you know how we like pie.

So that's it. I'm off the hook. I don't *have* to pay any more attention to anything other than the vegetables I'm about to plant this weekend until, like, October when the vegetables are dying out and I remember there are other things in my yard that want photo shoots and undivided attentions and thing.

So needy.

Tomorrow: Beans, cucumbers, lettuce, melons and tomatoes

Thursday, March 25, 2010

Part 3 in Soil Testing: Being done. It's the best part.

(Part 1)
(Part 2)

So, when we last left this wildly exciting series, the tests were finished and the numbers jotted down in my handy, if not nearly destroyed, little yard notebook (and online spreadsheet - DON'T FORGET THE ONLINE SPREADSHEET!)(I love it.)(In case you can't tell.)

Which is all fine and good, but, like - now what?

Well, now we amend. This is when we take that valuable knowledge of what organic nutrients we can add back into the soil to make it healthy and viable so that it will produce food that won't give us a tail. Because using chemicals derived from pee just can't be good for you - right? I mean, it just seems wrong. But I'll admit to not having done a super thorough investigation on the matter. To me, the fact that Miracle-Gro includes Urea as one of its main ingredients is enough for me. Then there was that whole 1 of 3 ingredients in the lethal injection cocktail thing...

Anyway - we won't be using anything as scary and wrong as all that. No, but we will be using things that seem nearly as creepy, so, like prepare yourselves to be a bit freaked out if you haven't, say, bought a bag of blood before.

Unique and interesting experiences! That's what I bring to you on this blog! Hooray! Perhaps I should bring you some experiences that aren't also disgusting and freakish?

We'll see.

For now, we're going to finish up this boring and tedious series with disgusting yet unique experiences with soil amendments like bone meal, dried blood and the less terrifying wood ash.

If you start to get all weirded out, just remember, there's wood ash waiting for you at the end and it's not scary at all. Though it is WICKED messy, so, like, don't wear your wedding dress for this or anything. I guess I should have warned you at the beginning. Sorry. Didn't realize so many of you worked in the yard in your bridal attire.

You guys are strange.

Anyway. Let's get started on being done.

1. Gather your things

Notebook with the test results, the pH preference list and amendment list included with your test kit, a measuring cup with ounce measurements and your amendments as follows:

Organic Dried blood
Organic Bone Meal
Wood Ash and/or E.B. Stone Sure Start mix

2. Ask the plants what they want, pH-wise


Refer back to the bottom sheet of your notebook, or the section in your spreadsheet where you determined what you'd be planting in which bed, and figure out what kind of pH those plants like.

For the record, I've never actually had to make any pH adjustments thanks to the very flexible nature of most vegetables' pH requirements.

But, to be sure, I do check the pH preference list that comes in the test kit and then note that pH preference above the beds' sketch so that I can check it against the test results. I mean, otherwise, why the hell am I doing the pH test? Right - no reason. So just try doing it. I bet barely any of you die from the extra effort.

In the case of Bed #1 up there, the pH preference was 6-7, which was perfectly fine for the beans, cucumbers and lettuce that I plan to have living there. Yay.

Check this for each area and make a note like this even though you may really not want to. It's good for you. Builds character.

3. Find out who's needy

Looking at the test results you jotted down in either your notebook, spreadsheet or both (Oh! Both!), start with the first area (I like to start with Bed #1, but you may be all anarchical and want to start with Bed #3, you rebel) you'll be amending and determining what nutrients will need to be added to bring all nutrients up to "Sufficient".

Let's use Bed #1 from my notebook as an example.


I just looked down the list and crossed out any nutrients that didn't require amendments - so any nutrient with a test result 3 or above or a pH above that of the bed's specific needs.

So, like, you can see that P (phosphorus) was off the chart and pH was fine, so those both got the beloved dash.

N (nitrogen) was in dire need of replacement (thanks, corn of 2009) and K (potassium/potash) was slightly low, so I pulled out my handy test kit chart to do the math.

4. Do the math. Barf.

There are a few things to note, here, before you start The Math.

Firstly, the recommendations on the chart are based on ounces you need to add per 100 square feet of soil. 

And I don't know how big y'all's gardens are, but all four of my beds don't add up to 100 square feet (96 sq feet to be exact, but you don't really care. Jerks.), so I take the recommendations and reduce them by 1/4, because each of my beds are 24 sq feet (3'x8'), which is so close to being 25 square feet, and therefore PERFECTLY 1/4 of 100, that I can barely stand it and feel like it's OK to fudge a bit.

I also realize that my math is no good, so it's likely I'm making math errors elsewhere, so what's this one little transgression going to matter in the grand scheme of me sucking at math, anyway? Not much, is how I figure it. Just go with me on this.

So - my recommendation here is to figure out how big your space is in square feet (3'x8'), divide 100 square feet by that number (24) and come up with your fraction (1/4) or multiplier depending on whether your space is smaller or larger than 100.

And if your garden is larger than 100 square feet, you are my hero and I'm jealous of your ass but also grateful I don't have to work all that land because I'm sweating just thinking about it. Yikes. I hope you don't have to hill potatoes.


Then, refer way back to the nutrient you're trying to amend (N - nitrogen), find the "Vegetables (leafy)" row  (since that bed will have leafy vegetables in it), scroll over to the (1) Deficient column under N (nitrogen), divide the 14 oz/sq foot reco by 4 and come up with the amendment recommendation of 3.5 oz.

I added 3.5 oz of nitrogen amendment (dried blood) to this bed.

Write that down in the notebook.

Wipe your brow - that was a lot of math. Your brain may hurt, but this is normal. Keep going.

5. Do the math some more. 

Now, like any good and annoying knitting pattern or automobile repair manual, repeat that process until you've calculated and noted all nutrient amendment numbers for all beds.

Know in your heart of hearts that this is the hardest part and soon you'll be finished and able to freely drink an entire bottle of gin while standing over your garden with grand superiority.

Or something a little less ridiculous and indulgent.

6. Add the amendments and be done already


Like I've said before, I amend with these things.

N (nitrogen) - Organic Dried blood
P (phosporus) - Organic Bone Meal
K (potassium/potash) - Wood ash and/or  E.B. Stone Sure Start mix

You may use other things, you may ignore my example altogether - that's up to you. And, for the record, I'm able to find these things at my neighborhood nursery, so hopefully you won't have too much trouble either. And if you do, well, I'm sorry. Perhaps you live in a unique part of the world where you can actually locally source feather meal, I don't know.

However, once I have my numbers and my amendments all sitting together cozy-like on the bench between the beds, I know I'm almost done with The Science and I become very, very happy. And relieved. And like starting cocktail hour early.

All that's left to do at this point is measure out the doses into your yard-approved measuring cup (I've relegated this one to Yard Only so that I don't have the creep-factor of later scrambling eggs in it knowing that EW dried blood was, like, *just* in there. Can you imagine? Ew.), sprinkle that over the soil, and rake it in.

And then, if you're so inclined, scoop up a trowel-full and admire how dark and luscious it is and how OH BOY HOWDY your tomatoes are going to love living here.


I usually then take the opportunity to test out the irrigation system on each bed to make sure it's working and not, say, missing a sprinkler head which results in a fountain of water shooting up and over into my neighbor's yard, and that also lets the amendments sort of soak into the soil and mingle with what's already in existence.

I'm not sure if this is required or recommended or forbidden or what - but I always do it and I haven't seen any watering-related horrors as a result.

Go with what your heart tells you, I guess.

Again - follow this process of measuring, sprinkling, raking and (optional) watering for each bed.

7. Be done

I doubt I have to tell you how to be done with soil testing, since I'm sure you've been wishing that *I* was done talking about it three posts ago, but just to be consistent, here - once you've finished this process, you are - by my process anyway - ready to plant your seeds or seedlings.

Which leads us to Step 8. PLANT SOME SHIT ALREADY.

But I'll get into that another day.

For now - go amend your soil. Just go, already.

Wednesday, March 24, 2010

Part 2 in Soil Testing: More tedious than boring.

(Part 1)

Do you like how I'm enticing you with these post titles? I'm really making soil testing seem like a fun outdoor activity for the early springtime. Go me! Really putting that marketing degree to work!

Er...

Well, whatever. You don't need candy-coated messages to convince you to test your soil, the reward of 200+ lbs of tomatoes should be enough.

Though - let me revert to my marketing background for just a moment and add the disclaimer that I'm not guaranteeing you 200+ lbs of tomatoes if you follow this soil testing process. I'd get all legal-ease on you, but my degree is not in law, it's in marketing - so you get the dumbed-down don't blame me if you only get 199 lbs of tomatoes because HI - this isn't McDonald's and no one here cares if you burn your lap with hot coffee because it's coffee and it's supposed to be hot and these results aren't typical, etc.

You know what I mean. Moving on.

So, for the next step in soil testing - the actual testing.

This year I decided that I'd try, for once, to be helpful and give you guys what I'm always looking for when I go to the internets to figure out how to do something - step by step instructions with pictures. And, for the most part, I think I did pretty well on the photos part of that, except toward the end when I was interrupted by my neighbors who wanted to whisk me away in their convertible to go plant shopping at a California Natives nursery in the mountains and then to taste wine while wearing our dirty garden clothes at a very accommodating and beautiful winery. 

They're so rude and I obviously had an awful time, so forgive me that I forgot to photograph the final steps of this process due to low-grade inebriation and spring fever and I'll just try really hard to describe it in detail. Kay? Yes.

And also isn't this just the most awesome thing about NorCal that you can show up at a winery in your dirty yard clothes, with your hair pulled back under a doo-rag and garden clogs on your feet and they just serve you up a flight of wine as though it were just the most run-of-the-mill thing because it totally is? Yeah. Let it be known - I love it here so much.

But for the testing, here's the 1-2-3:

1. Gather your supplies and go out to the garden


Specifically: your test kit,  a clear container big enough to hold about 6 cups of liquid and dirt, a trowel, a notebook, a writing device (like the item shown here known as a pencil) and a filthy tasting glass of Cytomax if you're recovering from a horrifically painful morning run where you ran as fast as your legs could possibly carry you but you still fell short of your distance/time goal by .03 miles.


2. Open up that notebook and make your test chart


A nice friend of mine gave me this notebook way back in the day and it makes me a little happy every time I use it because I'm actually using it for its intended purpose. How about that.

An important thing with testing soil is to test all the different areas where you are going to plant so that you can amend the soil properly for the plants that are going to be living in it. Or so I've surmised after making many mistakes due to laziness.

I have four beds, so I do four sets of tests and I set up my notebook with a sketch of the beds' vegetable holdings on the bottom page and then the beds' test results and amendments on the top with the year marked in the corner so that when I want to see how the soil looked last year before I, say, nuked it with corn, I can just flip back one page and TEE DAH, I can see that it was quite fine. Until.


The chart on the top page is just each bed broken out with column for of N (nitrogen), P (phosporus), K (potassium) and pH and then a column for amendment amounts of each to bring each to the level of "adequate". I also keep track of these results year after year on a handy spreadsheet, because you know I like it like that.

3. Make mud


And not mud like our Australian friend means when he says, "Mud!" while pointing to the bottom of his shoe and scowling, but a mud mix as indicated on your test kit.

In the case of my test kit, it's a 1: 5 ratio of soil to water. So, I scoop up 1 cup of the bed's soil with my trowel, dump it in the jar, pour in 5 cups of water and mix it up into mud.They say you can do this with less soil and water, as long as you keep the ratio constant, but I don't like doing any more math than is absolutely necessary, so I go with what the Ever-Knowing Box says. Plus, I have a jar that will hold 5+ cups of mud, so there's that.

4. Go do something else while the mud settles


Your mud mix has to settle and the soil needs to separate from the water, so you have to leave it alone for a bit. I find that this time during testing is good for getting random shit done around the yard or making phone calls to people to whom you don't wish to speak for very long because WHOOPSY gotta go - have soil tests ready - bye!

For the first bed, the Mud Intermission consisted of picking peas, throwing the ball for the dog and choking down half a glass of Cytomax. Guph. I can still taste it in the back of my throat. Barf.

You can decide how to piss away your 10 mins to 24 hours (though, that seems like a rully long time to wait for this process) between mixing and testing, though.

5. Set up your tests


Because I'm painfully A/R, I set up each test with its capsules and everything so that I don't lose track of what I'm doing as the springtime heat nukes my frigid brain cells.

6. Do the PH test first


The pH test works differently than the other tests and also gives you faster results, so I do it first so that I can look at the results while the other ones are stewing in their own juices.

For pH - fill the small side of the tester with soil to the indicator line so handily pointed out with that arrow, there.

Then open the green capsule and pour in the powder.

Then fill with clean water to the indicator line at the top there - also with a handy arrow. Shake. Set aside.

7. Start your tests

From your settled mud, take the dropper that comes with your kit, and without disturbing the sediment on the bottom, suck up some of the water and fill up the tester to the line on both the large and small sides of the tester like so.


8. Add the magic capsules


Once you've filled both sides of the tester with water, carefully open the capsule for that particular test (color coordinated to match your shoes and, um, the testers I guess) over the test side (small side) of the tester and pour in the magic powder.

I find it's effective to hold the tester between my knees while getting a scorching sunburn on my back because I forgot to reapply sunblock after my run. SO SMART.

Put the top back on the tester and SHAKE IT LIKE HELL. Really. Don't let any of the powder remain unshaken. Channel James Bond's bartender or Charo or Slimfast some other shaking cliche here if you have to.

Set it aside, right side up and try not to fuck with it. It needs to rest for about 10 minutes to give it time for the color to develop.

9. Follow this process for each of the tests: N, P, K

10. Find our your pH results


While you were putting together your nutrient tests, your pH test finished its job. Which I find to be so handy that I actually manage to ignore my inner lazy person that says to blow off the pH tests every time I go to do this. Anyway.

So, the test kit says not to hold it up to the light to see the color change, but I usually take the tester on a tour through the shade and the sun just to admire the difference in color.

Actually, I'm always a little bit iffy when it comes to determining which color it matches, so I figure this method lets me get the closest hue. In this case, I chose ph 7.0 Neutral because it was about the same shade of green as that marker. Rarely, if ever, is it as dark as the swatches show.

11. Mark it down in your notebook


So, once I've determined that the pH for Bed 1 is 7.0 (neutral), I put it in the book and go back to the other tests which are now settled down enough so that I don't have to smack them around or send them to their rooms to think about what they did.

12. Find your N, P, K results


So, with these tests you do the same thing you just did with the pH test, except they're different colors so that you can admire the rainbow of fruit flavors or some such finery.

In this case, I deduced that the P levels (phosphorus) were 1 - deficient, because I'm a glass is half empty girl when it comes to soil nutrient levels.

Or something.


Same thing for N (nitrogen): 1 - deficient. Which makes sense since this was the soil from last year's corn bed that had been overwintered with fava beans. I suspect that if I hadn't planted fava beans, this soil would have been 0 - depleted.

Yay for fava beans!

I then did this for K (potassium/potash), but I effed up the tester when I went to take a photo, so you don't get a photo. Just picture the same thing as above, but in orange. There you go.

After that, I marked it down in the book.

Ignore the fact that this says, "P = 4" here. That's because the photo and explanation above were from a different entry in the book.

Now, Bed #1 has been tested and we can move on to the other three beds.

FYI - this is when it starts to feel REALLY tedious. You must forge ahead. You must continue to add water to soil and mix mud and wander off to do mundane things like fix the drip lines and dead head the daffodils and drink Cytomax even though it makes you want to hurl.

And if it starts to get tough and you feel like quitting, remember that at the end of the process you're going to have soil ready to feed tomato plants that will then make you enough tomatoes for this and this and this.

And, if by some curse of humanity, you're not into tomatoes, that same buff soil can grow you things like this and this and this.

And if all that's not enough to keep you going, then I don't know what to tell you except that perhaps your luck is better than mine or you have access to piles of lovely well-rotted manure that arrive at your house by some means other than your own ill-equipped vehicle that will feed your beds without the need to test or you just don't really *need* to have more juju in the way of vegetable gardening like I do.

Lucky fuckers.

Anyway, speaking of amendments (like the previously mentioned miraculously occurring well-rotted manure), I'll finish up this completely enthralling series about playing in the dirt with a final upcoming post about how to take the test results you just got to amend your soil with organic things that aren't derived from pee so you can grow food that won't give you a tail.

It will be a rollicking good time, that's for sure.

(Part 3)

Tuesday, March 23, 2010

Part 1 in Soil Testing: This sounds boring.

Is it just me or does the process of soil testing seem like a swift pain thy ass?

See. I knew it. It does. Seem like it.

And, to be truthful, it is. But it's so worth it. At least it's proven to be worth it for the past few years that I've been doing it.

But, for whatever reason, I've gotten a lot of questions about this soil testing stuff despite its boring outward appearance, so rather than give you all random answers when you email me all separate like, I thought I'd offer up my soil testing process and experience here so you know what I'm doing back there when I say I'm doing The Science known as soil testing.

Be warned though, this is just how I do it. So, probably, it's not 100% perfect or right or legal or PC or safe to show children under 13 or feed to your gremlin after midnight and so on. So, like, don't get all, "That's not how you do that, Finny!" because I'll just be, like, "Um, actually, that's exactly how I do it, so stow it." and all.

You know how I am.

But really, I do want to share with you the importance of soil testing and the process by which a normal human person does it so that, if you have the yearning in your soul to do so, but have always felt like OH MY GAWD THIS SEEMS IMPOSSIBLE you can know that it is, in fact, not impossible at all and that you can totally do it because, hello, dummy over here can do it, so there you go.

Right?

Let me paint a picture for you:

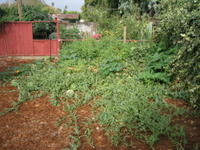
Once upon a time five or so years ago, Bubba and I moved into this house. This house did not have any vegetable garden to speak of, but it did have a big blank canvas of weeds from which I could dutifully carve a few raised beds for the requisite tomatoes and 
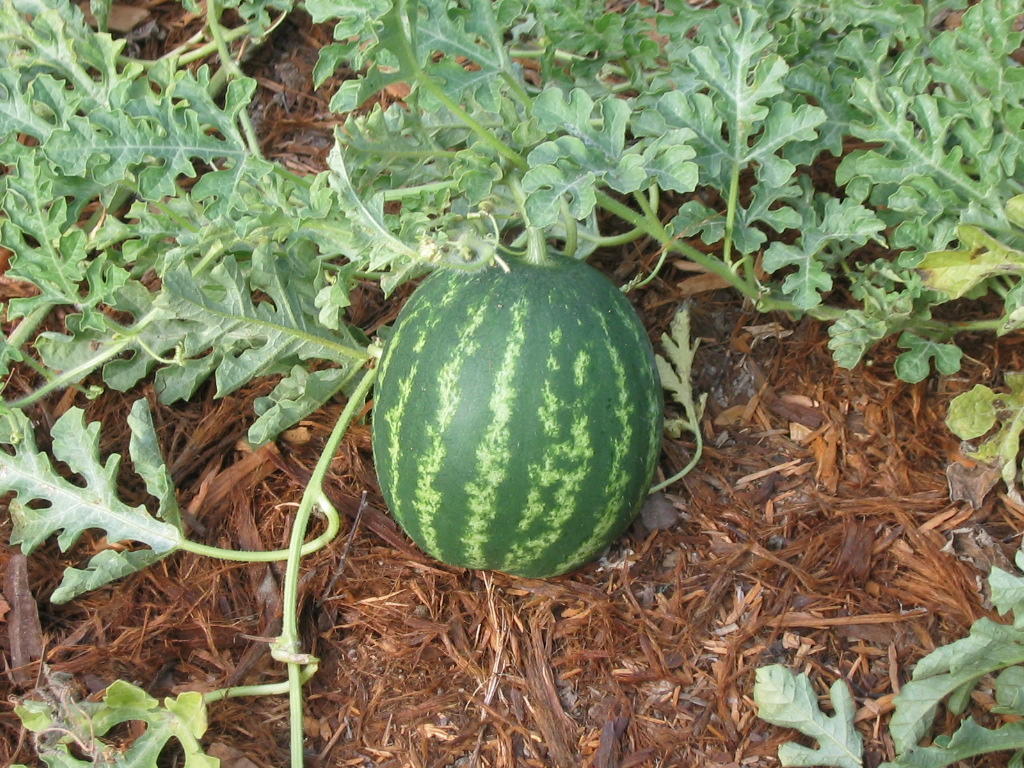
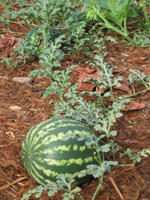
watermelons that spread out to take over the entire property and move in our neighbors' domain.

Into these two 3'x8 beds, which - let's not kid ourselves - were built by Bubba's talented hands, I poured a 50/50 mixture of garden soil and compost and then proceeded to plant with two tomatoes, some cucumbers and, from what I can recall based on its final growth, the world's most ambitious watermelons.

These plants grew and grew until I was afraid that we'd be lost forever under a sea of vining melons and tomato shrubbery.

It was a glorious time and much produce was had by all.

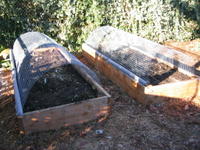
Then fall came and I took down the waning plants and constructed what we called, Mini Moffett, out of small gauge wire fencing and a lot of stabs in the hand, for a Winter Garden. Keep in mind that I'd never had a full fledged Summer Garden before these two beds, so a Winter Garden was just me being ridiculously over-ambitious and, I'll say it, a little cocky in the way of gardening.

Anyway, Mini Moffett went up successfully - again thanks to much help by Bubba's talented hands - and off I went merrily, and naively I might add, into the deep and murky waters of winter gardening. I think I grew somethings along the lines of carrots, broccoli, cauliflower and who knows what else.

It went fine. I didn't get a ton of stuff out of it, but it was winter and I wasn't expecting too much - just a year round garden that's all.

When winter finally passed and it was time to start thinking tomatoes again, I promptly tore out what was remaining of the winter crap (by March, anything remaining in the garden is considered by me to be crap), and went ahead just slamming new plants into the ground. Things like tomatoes and squash and things.

To say that summer crop went badly is to understate things greatly.

Firstly, the squash bugs arrived. And they devastated my squashes and melons and cucumbers the likes of which I've never seen. They even took down a mighty pumpkin and for that I will never, and have NOT, forgiven them.

Then, OH THEN, my tomatoes sucked ass. I don't know what their deal was but they just didn't do much. I mean, yes, I got some tomatoes, but nothing on the order of the previous year's bounty. And, come to think of it, plants from which I'd seen a huge success the previous year (cucumbers, peas) were also sucking asses.

Even though they were planted in the same spots as the year before, in the same soil conditions, same sun conditions, same water, same same same...

Let's let that last part sink in.

SAME.

That's when it dawned on me.

OH - Hi, have we read Grapes of Wrath? Haven't we heard of the Dust Bowl? Crop rotation? Soil depletion? Completely uneducated garden asses running amok planting crap without paying attention to the most important thing - the soil?

Yeah. Despite my best intentions, which really just focused on making tomatoes happen year after year, I'd neglected the most crucial part of the garden - the soil.

I'd made the same mistakes that they made back when we started raping the Midwest for crops every year without moving the crops around or amending the soil. I just went on planting as though the soil was going to replenish itself after giving everything it had to my little plants' roots all summer and winter and summer again.

RUDE.

I'm so rude sometimes.

And so, that is when I decided it was time to suck it up and test the soil.

Like, really sit down with the test kit (order capsule refills here) and a pencil and paper (can you believe those things still exist?) and water and capsules and a dropper and everything, and see where we stood with the condition of the soil.

Y'all - it was not pretty. In fact, it sucked ass pretty hard. I had sucked the life out of the soil by putting plants in season after season without adding anything back. I felt like a horse's ass. And a bit mean. And quite retarded.

So, with my shitty test results in hand (oh, high school - how I've missed thee), I marched off to the hardware store/nursery/place where you can get keys made to buy the amendments suggested on the soil test kit.

Which is when I ran into Awkward and Confusing Moment #783 - What is Muriate of Potash anyway and, my, that doesn't sound organic and healthy at all. Something about the word "muriate" made me nervous. Maybe because it sort of sounds like, "urinate"? I don't know. Well, turns out that it's, in fact, quite scary. Like, it's the 3rd drug (potassium chloride) in the three drug cocktail they use for lethal injection executions.

Yay! Let's grow our food in this!

No.

So, even though I was at the store with the intention of buying the soil amendments listed on the soil test kit to "fix" my soil, and I hate to go to the hardware store and not leave with every single thing on my list (we'll get into our reputation at the hardware store another time), I turned around and went home - to do some research.

See, despite all the "just use MiracleGro" advice I was getting, I still wanted to do this up all organic-like. I didn't want bizarre pee-sounding chemicals all soaked up in my food, doing untold damages to myself and the soil and the bugs and things. I didn't know exactly what would come from Miraculously Growing our vegetables, but I really didn't want to find out.

And, fine, I was being an obstinate hippie about it. FINE. Say the words, it doesn't hurt my feelings. I *do* live in California after all. Whatever.

Well, after some research online and with other organic gardeners and me mum and the good old Rodale's Guide to Organic Gardening, I found that I could amend soil with things that didn't involve horrifying chemicals that are 1/3 of the magic behind snuffing out our unsavory citizens.

I also found that a lot of these things were really fucking confusing (soybean meal). Or hard to find (feather meal). Or sort of ridiculous to source based on the small amounts I would need (well-rotted horse manure).

So, what I ended up with were the following:

To amend for nitrogen, I overwinter the beds with either fava beans or nasturtium, and then use organic dried blood to bring the measurements up to snuff.

To amend for phosphorus, I use organic bone meal.

To amend for potash, I use a combination of wood ash from our fireplace and this E.B. Stone Sure Start mix that includes the illusive feather meal as well as other organic ingredients that aren't creepy like muriate of potash.

I also started composting leaves, clippings and kitchen scraps so I could side dress the plants with the homebrew once they were established and during the winter when the beds were sitting around doing nothing.

Which is mostly what they do now in the winter, nothing. Because I am still so scarred by that total garden devastation summer to go whole hog back into a winter garden - testing or not. Though I did put some garlic and peas in the ground this winter and I'm really hoping it doesn't come back to bite me in the ass.

But you know that I've tested that bed already, and as soon as I tear out the garlic (soon, so soon), I will amend it appropriately, give it a neem oil bath for horrible insects and plant up its healthy soil with this year's allotment of black tomatoes, tomatillos, jalapenos and cilantro.

But, let's not get ahead of ourselves. We still have to test. Next time I'll show you how I do that.

Know that as I go through this, however, that this is how *I* do this, so it's not all professional and official and shit. This is just *my* way of gardening as organically and healthfully I can with the brainpower, resources and patience at my disposal with the goal of harvesting as many tomatoes as our mouths can handle in a year long period. Which, incidentally, is a lot.

So, just take that as you will. And then test your soil because, really, it's worth it.

Next time, step-by-step testing. Which, WOW, sounds boring. Sorry.

Part 2
Part 3

Thursday, March 18, 2010

Running loopholes

Today, I really thought that I was finally going to give myself a good reason to stay in bed and skip my runs on mornings when I feel like a lukewarm pile of crap.

Like this morning, for instance.

Except it's very hard for me to be like, OK - I feel like a lukewarm pile of crap due to this damned headache or whatever and, you know, I really would rather not run, so I won't. I'll just lie here in bed and wallow in my lukewarm misery. 

It is hard for me to shirk my morning runs because they are part of a finely established routine and routines are My Way and I'm very stuck in my ways.

I have my routines and I do not stray from these routines. Like, you know how they say that if you do something 17 times in a row you'll be more likely to continue doing it because the routine becomes normal in your mind or whatever? Yeah, well, with me, it's like DOUBLE NORMAL or, well, half as normal or something because once I'm in a routine it's barely possible for me to stray from it. Even if straying from the routine makes more sense than keeping to the routine or if straying from the routine could be a life-saving measure.

Which helps shine a little light on how I nearly killed myself with heat stroke instead of skipping a 9 mile run in 95 degree heat. A decision that would have been easy for 99.9% of the population to make correctly. Me though? Well, the routine was to run 9 miles on Saturday morning and, there it was, all being Saturday morning, so off I went, into the sweaty hot hellfire of a 95 degree morning, with the clear intention of killing myself with heat stroke but, and here's the important part, keeping to the routine.

So, there you have it - I take routines to the extreme. I'm regimented. I'm stuck in my ways. I'm psychotic. I'm unable to exercise the judgment of a dish towel. Etcetera.

But I have hope for myself and I'm working on a multi-step program to keep myself from dying an unnecessary but routine-fulfilling death by finding and exploiting justifications that make sense only to me.

For instance, one loophole I've been meaning to confirm and then use frequently is the one that goes, "If I feel like shit, but decide to go running anyway, I will have such an awful run (ie. It will be nowhere near the 24s and therefore a total failure) that it's not worth going anyway so I should just stay in bed and feel like crap."

Except that, this morning, as I set out to confirm this convenient truth, I must have done something magical with one side of my head pounding and one eyeball popping loose from its socket, because when I trotted back up my driveway after my run, I found that I'd done it FASTER than last time.

SHIT.

And I didn't have the lukewarm miserable headache anymore OR the popping eyeball!

DOUBLE SHIT.

That just won't do. How will I ever get to lie in bed without feeling guilty if I know that going for a run might actually make me feel better AND I might even improve my time?

Well, the answer here is, I won't. I won't ever be able to justify ditching out on a run for lukewarm misery in my comfy bed because the guilt would be too great. And even in all of my barely-Jewishness, the one thing to which I've managed to hold tight is my Jew Guilt. This power is very strong in me.

So, it looks like I'll have to come up with a more compelling reason to stay in bed on mornings of lukewarm crapiness when I don't have the 90 Degree Death Loophole to exploit.

Because you know I stick to THAT loophole with all of my might. In fact, I've even made it the 85 Degree Death Loophole on a few mornings when I found myself breaking a sweat putting on my sports bra. No one wants to run when you can't even get dressed without sweating through your underwear. That's just terrible.

Plus! You could die!

See, I'm very good at this loophole. I will have to work harder on the Lukewarm Misery one.

Wednesday, March 17, 2010

An example of me living on the edge

Hey Donk,

When it comes to sewing, I really don't know what I'm doing.

I'm not sure that I've ever told you exactly how I learned to sew, but I will tell you now that it included just the manual that came with my sewing machine and a lot of time spent ruining perfectly good fabric while creating new swears.

I believe that, in some circles, they call that hands-on learning, but in my circle - which includes Bubba and two sewing machine-fearful pets - we call this, "Time to Flee the Building."

Mostly because of my swears and how I tend to throw pointy things and shriek when things don't work. Which happens a lot when you don't know what.the.fuck.you're.doing.

Anyway and thankfully, it's been about 10 years since I departed down this long and winding road of seamstressness and, even though I basically still don't know what I'm doing, every now and then I deem it time to conquer a lingering sewing fear instead of letting it seep deeper and deeper into my sewing psyche. In the name of learning and growing, perhaps, I don't know.

This month's sew~along project and my stash's sudden lack of corresponding thread presented just such an opportunity and I seized it and conquered it and now I'm going to tell you about it at mind-numbing length so just get comfortable and maybe get a Guinness because I hear it's that time of year and what not.

Truth be told, I've already had one myself today, so this post might get confusing toward the end. Or maybe it's already confusing and my blurred vision is making that hard to recognize. Who cares! Moving on!

So, the old lingering fear I'm talking about has to do with thread.

Not, like, the thread itself - like I'm lying in bed at night worried my spools are going to come to life in their big woven box and come goose-stepping their way down the hallway toward my bed with swords or anything - but actually using thread properly in my projects. Specifically, sewing straight lines with thread.

And this is why I have always, until last weekend, been a strict Sew With Matching Thread Only person because it's a lot easier to hide huge threaded mistakes when they aren't contrasting wildly with the fabric upon which they were sewn.

But then the moment came, the one I knew I'd someday face, where I finally summoned the energy, desire and necessary accoutrement to complete a project only to find that LO I didn't have matching thread.

Shit. SHITshitSHITshitSHIT.

Now what?

Well, I decided it was time to be a grown up and face my fear of contrasting thread, that's what.

I gave myself a little pep talk to the tune of, "Don't be such a pussy. It's just thread and fabric and you don't want to be beaten by thread and fabric do you because that is lame." and set out to find a thread color in my stash to contrast pleasingly with my fabric of choice.

After I checked and rechecked the fabric against all of my green thread which refused to just change hues and WHY DON'T YOU JUST MATCH ALREADY? Rude. This thread is rude.

This is what I ended up with. Because I apparently think I'm the Easter bunny.

Granted, the color choices are a bit Springy, but since it's actually Spring right now, I'm going to let it slide. You normally wouldn't get this color combo out of me in, say, November, but that's OK. For now, pink and green work. And, really, this will probably be a gift for someone who likes pink, so there won't be that whole "Oh god it's pink. I hate pink." drama when I take it out of the closet with the intent of using it or anything.

The green fabric though? You know I love that. It's just SO GREEN and I love green. Which, one would think, would mean that I love St Patrick's Day, but it doesn't. Beyond the color green and Guinness in my office's kitchen on this day, I have no emotion for this holiday other than hope - that no one will pinch me so I won't have to punch them in their face.

I don't enjoy being pinched.

What I do enjoy, however, is how I managed to make my way through this whole project, flax-filled heating/cooling pad and all, with contrasting thread that looks, dare I say good.

I should have taken a picture of the pad with its many contrasting seams. Thing of beauty, that.

And so, Future Person Who Will Receive This As A Gift Because I Already Have Heating and Cooling Pads Galore, please enjoy this stylish and therapeutic Obi belt with the understanding that the making of it proved that I, against all odds, can sew with contrasting threads without making a huge fucking mess of things.

Please take a moment to notice how even the back sides of all sewn objects are straight and not all knotted up and mangled like they have been in the past.

Why, that looks downright respectable as far as seams go.

This was a big moment for me and I want you to know that while you sit on it and let it soothe your aching back.

That's all. Finny can sew a straight line with pink thread on green fabric. I guess I think I deserve a cookie or a gold star or something.

Rather, I shall go have another Guinness and celebrate my victory over string.

Cheers,
Finny

Thursday, March 11, 2010

Running update: supertitioning like a pro. That's something.

So, I feel like I should tell you that I am, at this moment, writing this post from the sun-warmed comfort of my back patio.

Because HI THANK YOU WEATHER it has stopped raining for one godforsaken second. YAY.

So, obviously, when given the opportunity to work from home on a sunshiny afternoon that's not soaked in rain and misery, I took of my heels (even though they're the hottest), put on flip-flops (which are patently not the hottest because they're dirty and worn out) and dragged the laptop and cell phone out to the back .40 for some quality time under the bright shiny ball.

I'm sorry to keep rubbing it in, but the heat from the sun has dulled my senses to the point where I no longer know when I've gone too far.


In other self-congratulatory fun and at great risk of totally jinxing myself, I will tell you that I've managed FOUR sub-24 interval runs in a row which makes me want to high-five myself like a total ass and now I've developed one of those pro athlete-style superstitions (even though I can't even remotely be considered a pro anything) that revolves around my running attire having to be a certain way in order to Keep The Streak Alive.

And, by running attire, you certainly know that I mean my new running top which, as a good friend would say, is The Most.

While it may be The Most in some ways, it is also The Least in other ways, which is how it has become, in my mind, the source of my sub-24 interval running powers.

Like, I finish my runs in The Least number of minutes and seconds when I wear this top. And I get The Least amount of annoying comments about the chilly temps because of the skin-shielding power of its tiny short sleeves when I wear this top. And I sweat The Least of all my sleeve-having tops when I wear this top.

And that's the most The Least things I can think of. Because,well, we're all confused by that last paragraph.

Anyway, I now have a cozy little gross superstition to work into my pre-run repertoire and, while I have been running faster, I'm still pretty slow and I now have to worry about one more time-consuming thing before I can get my ass out the door and that is determining the status of The Top.

Is it clean? OK, no.
If it's not clean, is it at least not gross enough smelling YET that I can bear to be inside of it for 23:XX (awesomely fast) minutes and seconds? OK, maybe if I hold my head just so and don't, say, try to wipe my nose on the inside of the collar.
Let's go.

Do you see how gross this newly discovered superstition has made me? I'm disgusted by my own self. But I don't get down about it. Ho no. I just look at my last four interval times, smile proudly and then high-five myself, thus negating any self-pride I might have reclaimed by reviewing my interval times.

*Sigh*

Of course, there is the other issue of The Top to contend with, and one that can keep me entertained for the whole of a sub-24 run - Shouldn't I just get another top so that I am not running in a sweaty snot rag?

But, my mind being the fresh hot mess that we all know it to be, sends me round and round in the "What if I buy another short-sleevey top just in time for it to become officially tank-top season thus rendering the purchase superfluous and, well, it would mean more shit in my overflowing workout drawer of clothes. What if that?"

Like I've said before, it's a mess in my head. And also I won't be buying another top. I'll just be hauling Bubba's clothes out of the washer so that I can get down with some The Top washing before Saturday. Problem solved. Though I wish I'd solved it during one of those runs because that would have made them productive rather than torturous.

Back to the good news though - it's sunny, I've hit FOUR (4)(!) sub-24 interval runs in a row and my poor, helpless Virtual Partner is totally wasting away in my dust to the tune of an average 9:15 pace.

And while my shortish long run of the weekend (7 miles) wasn't in the Virtual Murder category (which would be sub-9:59), I did score a 10:13 pace, which by my standards is pretty good. In fact, it's the fastest pace I've managed on my shortish long runs since I've gotten back in the habit of wearing the Garmin while I'm out.

Remember, my goal is to sub-60 10K in April, so I do have some work to do (specifically, I need to run a sub-10 minute mile pace for 6.2 miles), but we're close. And this weekend I'll do 8, though I expect I'll be wearing my favorite tank-top for the occasion since it MAY get into the 60s around here.

Tuesday, March 09, 2010

So much gardeningblahblahblah

Holding true to my gardeningblahblahblah promise, I'm here to tell you that the fava beans have met their end.

FUCK YEAH!

I mean, THAT IS GOOD because it means that the 2010 garden is almost, sort of, soon to be planted and growing and making me tomatoes just as soon as I can turn, test, amend and plant the soil.

Though that process is a little less FUCK YEAH than the eating of tomatoes because it involves math skills and patience, which are two things you well know I don't possess in any meaningful quantity.

I summon all my inner resources to complete this task every year and then I take a break from math and patience for the remainder of the year. Which you should know in case you're expecting me to listen gracefully while you explain your hernia procedure or request my help in calculating more than the tip on a dinner bill where there's more than two digits at any point beyond April 2010.

Though, you probably won't get much help from me now, but you knew that. I have to conserve my mental capacities! The garden requires it!

You understand.

Along with the fava massacre, there were two other momentous garden occasions this weekend which I will share with you now.

Momentous Garden Occasion #2: Potato planting

Yes, friends, we have decided to continue the WT theme from our hick front yard to the garden in back by adopting the Tire Method for potato growing.


Meaning, rather than planting potatoes in rows and then hilling them with soil when they require it like normal people, we instead fill a tire with soil, plant potatoes in there, and then when the potatoes sprout vines and grow up through that soil, we put another tire on top and fill that with soil through which the vines can grow. And on and on until we have a tower of potatoes and dirt looming at the back of the yard, further confirming how WT we are.

As though there's been a lot of doubt on the subject.

To accentuate the WTness of it all, I've dragged over a sprinkler line from the nearest bed and plugged it down in the center of the tire to provide automatic irrigation to the potatoes so that my lazy ass doesn't have to go dragging the hose all out there to do it by hand.


Because, water by hand? Oh, that's not going to happen.

So you know, I planted 2 red creamers, 2 gold creamers and 3 or 4 banana fingerling potatoes in that tire you see there, so we'll see how this goes since I don't know anything about growing potatoes. Experiment alert!

Momentous Gardening Occasion #3: Rain barrels


See, long ago, my Montana friend (as I call her to Bubba as though she and I have been BFF for a decade) Nici at digthischick, installed rain barrels at her place and I thought it was the coolest thing. I also thought, "I must have this now", and then proceeded to totally forget about it sort of while we were busy having our porch redone, relandscaping the backyard, putting in a patio and growing 200+ lbs of tomatoes.

But the thought has been back there. Loitering about, making trouble. Until a few weeks ago, when I bit the bullet and ordered my barrel and the diverter thing that, in no way, actually "goes with it" even though it appears to on the website.

Whatever. We made it work.

And then, just as Funny Contractor was finishing up our porch and putting the finishing touches on its facade, the barrel showed up with a label taped to the side and proceeded to highlight the generous proportions of the new concrete pad area ever so elegantly.

As you know, we're a class household, so this went very well with the new posts and paint and un-WTness of it all.

Thankfully, last Sunday morning I decided to take my morning brew on a walk over to the gutter's downspout in the pre-determined Future Rain Barrel site to "inspect" its integrity and figure out where the F I was going to put in this diverter creature.

And, as so often happens when I "inspect" things with the final thought of including them in a project, the project launches into action and, before I know it, I've lost my mug of tea in the shuffle and instead have a pocket full of sockets (band name, anyone?) and the stepladder - which I'm balancing precariously on half a concrete step and some really soft downspout moistened mud.

Yay.

And then, thankfully again, Bubba comes out to find out how come the house is so quiet and what the hell is that woman doing NOW, to find me teetering on the stepladder removing screws from the downspout bracing, with the parts for the diverter all splayed out on the back patio.

Being the smart, and incredibly wise and self-preserving, man that  he is - he offers up his help and then gracefully guides me through the diverter installation - all the while letting me feel like I'm doing it all by my tin snip wielding self. Which I can assure you, I am not.

I need this man. He keeps me from wrecking the house.

And, before long, one of our fabulous neighbors - who likely smelled snipped tin on the wind - showed up in our backyard with a new book for me (love her) and a demand to know how we could be putting in rain barrels without calling her first. She is an expert on the subject after all, since she's installed two on her house already, with a third waiting in the wings.

So, with the combined knowledge of a rain barrel-installing expert, one very handy man and caffeinated but mostly useless blonde (moi) - the rain barrel managed to get installed. And, because my fabulous neighbors continue on their quest to sainthood - I also received a second rain barrel for the water collecting efforts.


Because they had "an extra they weren't going to use". Again, so awesome these two.

I do hope they know we don't even have a will into which we could write them. *Eek*

Oh, and while this isn't quite so Momentous but rather just helpful - for any of you out there considering the repurposing of otherwise useless yard materials into an auto-filling birdbath, let me suggest an alternative sealing method to silicone gel: inner-tube scraps.


See, I'd had the birdbath all auto-filling since that weekend when I installed it, and I noticed that some water was leaking through the silicone seal into the surrounding landscaping.

Well, to be truthful, I just thought the dog was drinking the water for a while and chose to ignore the whole thing, but then I realized that was impossible because she hadn't been out there long enough to do that kind of drinking.

She's no boozer, this dog.

Anyway, when I came to terms with the fact that the seal was leaking and that, in order to fix it, I'd have to dismantle the whole thing, dry it out and take another go at it with the liquid sealant, I decided I needed a different approach.

So, in my truest form, I went out to the garage on the hunt for something like a rubber gasket. Except, we didn't have any rubber gaskets of proper size. And YOU KNOW I'm not pedaling off to the hardware store if I don't have to. So, instead I wandered the garage looking for something that fit the description of: thin rubber material, easily cut to size, preferably not the most important piece of whatever it lived in at that moment.

And, of course, my eyes fell on the ever useful busted bike inner-tubes just hanging around in the garage.

Perfect.

So - if you want to make this birdbath all watertight and what not - and you happen to have some busted inner-tubes laying about doing nothing - take your cutting device of choice, slice out 2, 2-3" chunks, open them up by slicing down one side of them vertically, then cut an X in each of them smaller than the diameter of your sprinkler nozzle spout (without the nozzle attached), slide one down over the nozzle spout and then push that through the hole you made in your birdbath bowl. Then slide the other over your nozzle (so that you have a layer of rubber below the spout and bowl and above the bowl and below the spout) and screw on the nozzle attachment.

Basically, you treat these two flat pieces of rubber inner-tube like ghetto gaskets that, when cinched down with the sprinkler nozzle, create a waterproof seal.

Not that the dog's going to stop drinking out of the fountain, but you get what I mean.

Enjoy all of that.

Monday, March 08, 2010

Adopt a Crop 2010 : Exotic. Freaky. You decide.

So, good job, people. On picking the melon I wanted you to pick.

My mental powers of persuasion must be getting good and strong since most of the people who've seen that melon have not wanted to have anything to do with it, much less to grow it in a garden for food.

No, I do believe the question of whether ownership requires inoculation or at least a stout whip was brought up.

If my memory serves, it does not require either, though ownership may very well require me to purchase a juicer, which is on my list anyway now that I've taken to dispatching the farmshare beets in juice form because HOLY how else am I going to reclaim the friggen crisper if I don't get rid of them quickly and swiftly and SOON? See, thing is, I don't know. So, I feel I need a juicer.

And, hey, these melons allegedly have a "banana-lime-tropical fruit taste and [are] good juiced" which sounds a lot like a ringing endorsement for a juicer, then doesn't it? Yes. I'm sure you agree.

I'm considering this one since it's the same as the one we used in Hawaii when we were there last and let me easily make these from Bubba's coconut conquest which sounds kind of freaky but was really just the result of Bubba swinging an abandoned golf club at a coconut tree while I drank cocktails and cheered him on.

Quite a conquest it was.

Anyway, let me know if you have a juicer that you love and that I should buy and to which I should dedicate extremely valuable cabinet space. More importantly, if you have a juicer that you HATE and from which I should run screaming, please tell me about it so I can avoid a horrible and disappointing juicing disaster, kay?

Thanks muchly.

Now, let's stop talking about juicers and conquests and instead about this year's Adopted Crop: Jelly Melons. 

Specifically, African Horned Cucumber Melons.

Do I eat it or get a restraining order from it? Hard to say.

They're kind of a hideous sight, I'll agree. Though, aren't you kind of intrigued at the same time? Kinda wonder what something like *that* could taste like or what it might look like chucked across the street at the kids who shriek mightily for no good god damned reason?

Yes, me too.

And, really, imagine a projectile such as this headed in your direction...You'd shut up and run, wouldn't you? Me too and that's all I wanted to know.

Anyway, the jelly melon has won a space in this year's garden. And, according to Bubba (he got to choose the other melon without even having to vote against or with anyone - so special), the jelly melon will be growing (hopefully successfully) alongside the Georgia Rattlesnake Watermelon - with its freaktastic stripes and enormous hugeness.

I don't think I even have a cutting board large enough to accommodate one of these.

Imagine the cute couple they'll make - all huge and spiny and striped and jelly-filled!

Ok, so it's going to be less cute and more scary, but that's OK, they'll go well with the black tomatoes and purple beans in the other beds to complete my haunted garden of vegetable evil.

Or whatever. Maybe it's just really exotic and I should be playing the Rare Heirloom Deliciousness card here instead.

Though I do lean more to the freaky than the exotic, truth be told. I mean, really, what's exotic about brown hair, green eyes and freckles? Nothing. But you put that boring package in florescent yellow goggles and trot it out on some lava with matching yellow fins and a potty mouth and it does Freaky just fine.

And suddenly I'm a little self-conscious so never mind that last part, there.

All you need to know is that the garden plan has been finalized, thanks to some fairly enthusiastic voting on y'all's part (74 votes total) and Bubba's swift choosing of the watermelon which took him all of two seconds.

Apparently he's missed watermelons in the garden. Or at least he's missed their vines taking over our backyard, thus rendering null and void any thought of mowing or yard work back by the beds because WHOOPSY the watermelon vines are covering everything and totally in the way.

And when I plant the rest of this season's off-color vegetables, I'll let you in on all of the vulgar details. 

Are you starting to sense an alarming theme? Yeah, me too.

Commence gardeningblahblahblah.